Southern Comfort Food
Buttermilk Fried Chicken
24-hour buttermilk and hot sauce brine, cast iron pan-fried in peanut oil. Hill Country Sunday-supper fried chicken with a mahogany crust.
Quick answer: Texas buttermilk fried chicken is a Southern Sunday-supper classic: a whole chicken cut into 8 pieces, brined 24 hours in buttermilk and hot sauce, dredged in seasoned flour with cayenne and smoked paprika, then pan-fried in peanut oil in a 12-inch cast iron skillet at 325F. Skin-down 8-10 minutes, flip, another 8-10 minutes, internal 165F. Rest on a wire rack, not paper towels. Mahogany crust, juicy interior, eight pieces feeds four.
I learned to fry chicken from my grandmother in Fredericksburg, in a 12-inch Lodge cast iron skillet that had belonged to her mother before her. Sunday after church the chicken came out of the buttermilk, dredged in seasoned flour on a sheet pan on the kitchen counter, and went into the popping peanut oil one piece at a time while the green beans simmered on the back burner. If you are still hunting for the right pan, my cast iron skillet buying guide ranks the ones that hold frying heat the best.
The skillet was the only one she would use for fried chicken. The oil never came up past the halfway point of the chicken; this was pan-fried, not deep-fried, and she was firm about the difference. The crust was mahogany. The meat steamed off the bone. I have been chasing that exact piece of chicken in my own Hill Country kitchen for twenty years, and the recipe below is as close as I have come.
Texas fried chicken sits inside the broader Southern fried chicken tradition, which itself traces back through enslaved African cooks who brought West African frying techniques to the American South, layered onto Scottish settlers' frying-in-fat tradition (the English baked or boiled their chicken; the Scots fried theirs). What grew up in Texas is a Hill Country Sunday-supper version, served at places like Babe's Chicken Dinner House (Roanoke, Carrollton, Frisco, Burleson), Bubba's Cooks Country in Dallas, Lucy's Fried Chicken in Austin, and Frenchy's in Houston (Creole-influenced and proudly its own thing).
The constants across all of them: buttermilk brine, seasoned flour, cast iron, peanut oil. The variable: how spicy. The recipe below is a 24-hour brine, double-dredge, medium-heat skillet fry, with cayenne and smoked paprika in the dredge for warmth without scorch. Total time on the clock is 24 hours and 45 minutes; total active time is closer to an hour. Most of the work is patience.
Hill Country Sunday-Supper Origins
Fried chicken is the Sunday-supper centerpiece across the American South, and the Texas Hill Country has its own version of that tradition. From Fredericksburg to Boerne to Wimberley, the German-Texan kitchens that defined the Hill Country in the late 1800s adopted Southern fried chicken as a Sunday-after-church meal, served alongside green beans, mashed potatoes with gravy, biscuits, and pickled okra. My grandmother's Sunday in Fredericksburg started with the chicken going into the buttermilk on Saturday morning, and the whole house smelled like Frank's RedHot for the rest of the day.
The roots are older and deeper than the Hill Country, though. Southern fried chicken as we know it grew out of the work of enslaved African cooks in the antebellum South, who brought West African deep-fat-frying traditions into Southern plantation kitchens. Scottish settlers had brought a frying-in-fat technique with them too (English cooks of the same era boiled or baked their chicken).
The two traditions met, the Africans seasoned the chicken aggressively in ways the Scots did not, and what came out of that meeting is what we now call Southern fried chicken. African American cooks carried the technique through the Great Migration into northern cities and across the South, and every regional variant - Nashville hot, Maryland-style, Texas Hill Country, Louisiana Creole - traces back to that origin.
In Texas the tradition stayed close to its Southern roots but took on a Hill Country flavor: cast iron skillets (already in every German-Texan kitchen for chicken-fried steak), peanut oil (cheap and abundant in East Texas), and an almost universal hot sauce in the brine (Frank's RedHot, Cholula, or Tabasco depending on the cook). The result is a fried chicken that is more seasoned than most Southern versions, slightly spicier, and almost always pan-fried in cast iron rather than deep-fried in a Crisco-filled Dutch oven. The recipe in this post is the Hill Country version.
Why Buttermilk: The Acid Tenderizes
Buttermilk is the single most important ingredient in this recipe, and the science is real. Cultured buttermilk (the stuff sold in the dairy aisle, not powdered) has a pH of around 4.4, which is acidic enough to slowly denature the protein bonds on the surface of the chicken. Translation: the buttermilk gently loosens the muscle fibers from the inside out, which makes the cooked meat more tender and helps it stay juicy through the high-heat fry. A water-and-salt brine seasons the chicken but does not tenderize it the way buttermilk does.
There is a second mechanism too: lactic acid. The same acid that tenderizes also keeps the chicken's surface slightly tacky, which is what makes the seasoned flour cling and stay clung through the fry. A chicken brined in plain water and rolled in flour will shed half its crust into the oil in the first two minutes. A chicken brined in buttermilk holds its crust like it was glued on. (And in a way it was - lactic acid is acting as a chemical adhesive between meat and flour.)
Why Full-Fat Buttermilk Matters
Use full-fat cultured buttermilk, not low-fat or non-fat. The milk fat coats the chicken in a thin film that browns into the crust beautifully. If you cannot find buttermilk, you can substitute 1 quart whole milk + 4 tablespoons lemon juice or white vinegar, mixed and let to sit for 10 minutes, but the texture is not quite the same. Real buttermilk wins.
The 24-Hour Brine
Twenty-four hours is the sweet spot for buttermilk brining a 4-pound chicken. Less than 12 hours and the lactic acid has not penetrated past the surface; more than 36 hours and the chicken's surface starts to break down too much (the texture goes mushy on the outside, which is a real risk with very long brines). The 24-hour mark gives you full-depth tenderization, fully-seasoned meat to the bone, and a chicken that is structurally sound for the dredge.
Salt and sugar both pull water out of the chicken initially via osmosis, then the salt dissolves into the meat's own moisture and gets re-absorbed along with the buttermilk's flavor. By hour 24, the chicken is heavier than it started (water-bound to the salt), juicier than it was, and seasoned all the way through. This is the same brine logic that makes a Thanksgiving turkey work, just scaled down and acidified.
Brining Logistics and Weekend Planning
Brine in a 1-gallon zip-top bag if you have one - it pushes the brine into contact with every surface of the chicken with no air pockets and takes up less fridge space than a bowl. If you brine in a bowl, weight the chicken down with a small plate so all pieces stay submerged. Refrigerate the entire 24 hours; do not brine at room temperature. For weeknight planning: brine Friday night to fry Saturday evening, or brine Saturday night to fry Sunday after church.
Hot Sauce in the Brine
The half-cup of hot sauce in the buttermilk is non-negotiable in the Texas version. The hot sauce contributes three things: vinegar acidity (which compounds the buttermilk's tenderizing), capsaicin (which carries flavor and a low-level heat that you taste as warmth, not burn), and the depth of cayenne and aged-pepper notes (which give the brine its signature reddish tint).
Frank's RedHot is the canonical choice in Texas (it is the same hot sauce that defined Buffalo wings and a thousand Texas kitchen tables), but Cholula works beautifully and brings a slightly more Mexican note (tepin and chipotle). Tabasco is sharper and more vinegar-forward; use it if you like a leaner, more acidic brine. Avoid the sweeter sauces like sriracha (sugar in the brine starts to caramelize on the chicken's surface and burn during frying) and avoid the fermented sauces like sambal or gochujang for the same reason. The dish is Southern; keep the hot sauce Southern.
The chicken does not taste hot at the end. The capsaicin level after 24 hours of dilution in buttermilk and 18 minutes of frying is mild; you taste the depth and a faint warmth, not heat. If you want actual heat, that goes in the dredge as cayenne (see below) or as a Nashville hot finishing oil. The brine hot sauce is for flavor, not for spice.
The Seasoned Flour Dredge
Three cups of all-purpose flour for an 8-piece chicken is the right ratio - enough to coat fully with some left over, not so much that you waste half the bag. The cornstarch (2 tablespoons) is a bakery trick: starch crisps harder than flour does, and a small amount of cornstarch in the dredge gives the crust a more brittle, shatter-on-the-bite texture. Skip the cornstarch and the crust is fine but slightly softer.
The seasoning blend is layered: smoked paprika for warmth and color, cayenne for heat, garlic and onion powders for depth, black pepper for pop, salt for the seasoning baseline, and a teaspoon of baking powder to lift the crust slightly during frying (the baking powder reacts with the buttermilk's acid and produces small bubbles in the flour, which puff and crisp). Some Hill Country cooks add dried thyme or oregano; my grandmother used thyme. Some add MSG (a teaspoon's worth makes a real difference); some skip it. The recipe above is the canonical Texas version with thyme optional.
The Babe's Clumping Trick
The trick of dropping a few tablespoons of buttermilk brine into the dry flour and rubbing it in with your fingertips is the Babe's Chicken Dinner House move - it creates small clumps in the dredge that fry up into shaggy crispy bits on the surface of the chicken. Skip this and your crust is smooth; do it and your crust looks like the photo.
Single Dredge vs Double Dredge
A single dredge - chicken from buttermilk straight into flour, then to the oil - produces a thinner, more delicate crust. This is the Lucy's Fried Chicken Austin style and it is excellent. A double dredge - chicken from buttermilk into flour, back into buttermilk briefly, then back into flour again, then to the oil - produces a thicker, craggier, more aggressively textured crust. This is the Babe's Chicken Dinner House style.
Both are correct; the difference is purely texture preference. I prefer the double dredge for thighs and drumsticks (the dark meat takes the heavier crust well) and a single dredge for breasts (the white meat is leaner and a thinner crust shows it off better). For your first fry, do a double dredge across the whole bird - the visual payoff is worth the extra step, and a thicker crust is more forgiving of a slightly-low oil temperature.
The 15-Minute Dredge Rest
Whatever you choose, let the dredged chicken sit on a wire rack for 10-15 minutes before frying. The flour hydrates with the buttermilk on the surface and forms a sticky paste that fries up into a unified crust. Skip this rest and the dredge sloughs off in the oil within the first 90 seconds. This single 15-minute rest is the difference between fried chicken and fried chicken-flavored bread crumbs.
Peanut Oil, Lard, or Vegetable Oil
Peanut oil is the Texas standard for fried chicken, and it earns the position. It has a high smoke point (450F), a clean and slightly nutty flavor, and it produces an exceptionally crisp golden-brown crust. Most Texas Hill Country cooks use peanut oil; most barbecue joints and chicken houses (Babe's, Bubba's, Lucy's) use peanut oil. If you have a peanut allergy concern at the table, swap for any neutral high-smoke-point oil (canola, vegetable, sunflower).
Lard is the older Southern tradition, and it produces a markedly more flavorful chicken. Render your own from pork fat, or buy refined leaf lard from a quality butcher; the supermarket-shelf hydrogenated stuff is a different product and not worth using. Lard has a smoke point of 370-400F (lower than peanut oil), so you fry slightly cooler at 300-310F. The flavor is unmistakable. If you have access to good lard, it is worth the experiment.
Crisco shortening was the mid-20th-century Southern standard - my great-grandmother used it - because it was shelf-stable and cheap. It works fine but the flavor is more neutral than lard and the texture of the crust is slightly waxier than peanut oil. The Crisco-vs-peanut-oil debate has been going on in Texas kitchens for sixty years and there is no resolving it. Use what your grandmother used; that is always the right answer.
Why Cast Iron and the 1.5-Inch Oil Depth
Cast iron is the right vessel for pan-fried chicken because it holds heat. When cold chicken hits the oil, the temperature drops by 20-30 degrees; a thin stainless or aluminum skillet keeps dropping and never recovers, and your chicken fries in cool oil and turns greasy. Cast iron's mass keeps the oil temperature stable and pulls the heat back up to 310F within a minute or two of the cold chicken hitting. This is why cast iron exists and why every Texas kitchen has one.
Use a 12-inch skillet that is at least 2.5 inches deep (a Lodge 12-inch is canonical). The depth matters because you need 1 to 1.5 inches of oil and another inch and a half of clearance above so the oil does not spit over the side. A 10-inch skillet works for half the recipe; a 14-inch is better than a 12-inch but most people do not own one. Avoid enameled cast iron (Le Creuset) for this - the enamel can crack from thermal shock with the cold chicken.
Why 1.5 Inches of Oil (Pan-Fry, Not Deep-Fry)
The oil should come 1 to 1.5 inches up the side, which is enough to come halfway up a chicken thigh. This is pan-fried, not deep-fried. The chicken is partially submerged, and you flip it once. The exposed top side fries from radiant heat and the partial steam from the oil. This is the Hill Country style; the deep-fried version (oil over the top of the chicken, no flipping) is more of a Tennessee-and-Carolinas approach. Both work; the cast iron pan-fry produces the textural contrast my grandmother wanted - mahogany on the bottom, slightly less mahogany on the top.
Temperature Management: 325F to 300F and Back
Heat the oil to 325F before the chicken goes in. The cold chicken will drop the oil to about 300F immediately, and the goal is to hold a steady 300-310F for the entire fry. Frying below 290F means greasy chicken (the oil soaks into the crust before the crust sets); frying above 320F means a burned crust before the meat reaches 165F internal. The 300-310F band is the goldilocks zone, and a clip-on thermometer is the easiest way to stay there.
Adjust the burner setting throughout the fry. On most stoves, medium-high gets you to 325F initially, medium drops you to 310F when the chicken is in, and medium-low holds 300F for the duration. Each stove is different; watch the thermometer and not the dial. If the oil is creeping up to 320F, drop the heat one setting. If it is dropping to 285F, raise it. The active management is part of frying, not a sign you are doing it wrong.
Internal Temperature Targets
Internal temperature is the only honest finish point. Pull the chicken when the thickest part of the thigh reads 165F (74C) and the breast reads 160F (carryover heat takes it to 165 during the rest). A drumstick sometimes goes a little over because the bone conducts heat; a wing finishes fastest. If a piece is browning too fast on the outside but is not yet at temperature inside, drop the heat to medium-low and finish it with the lid partially on the skillet for 2 minutes.
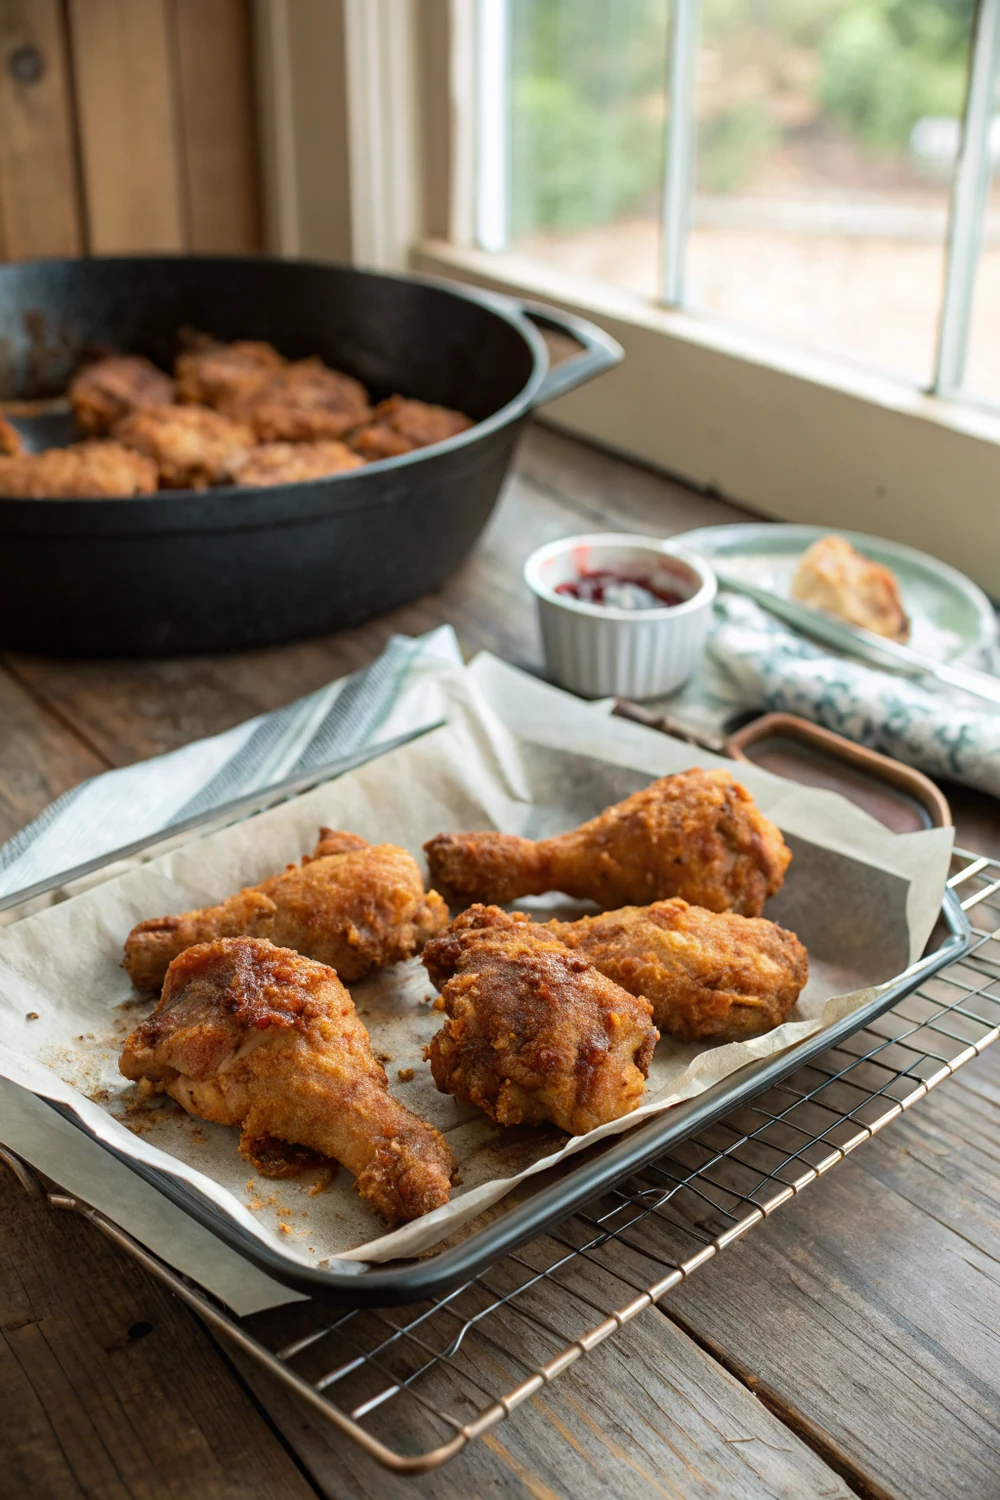
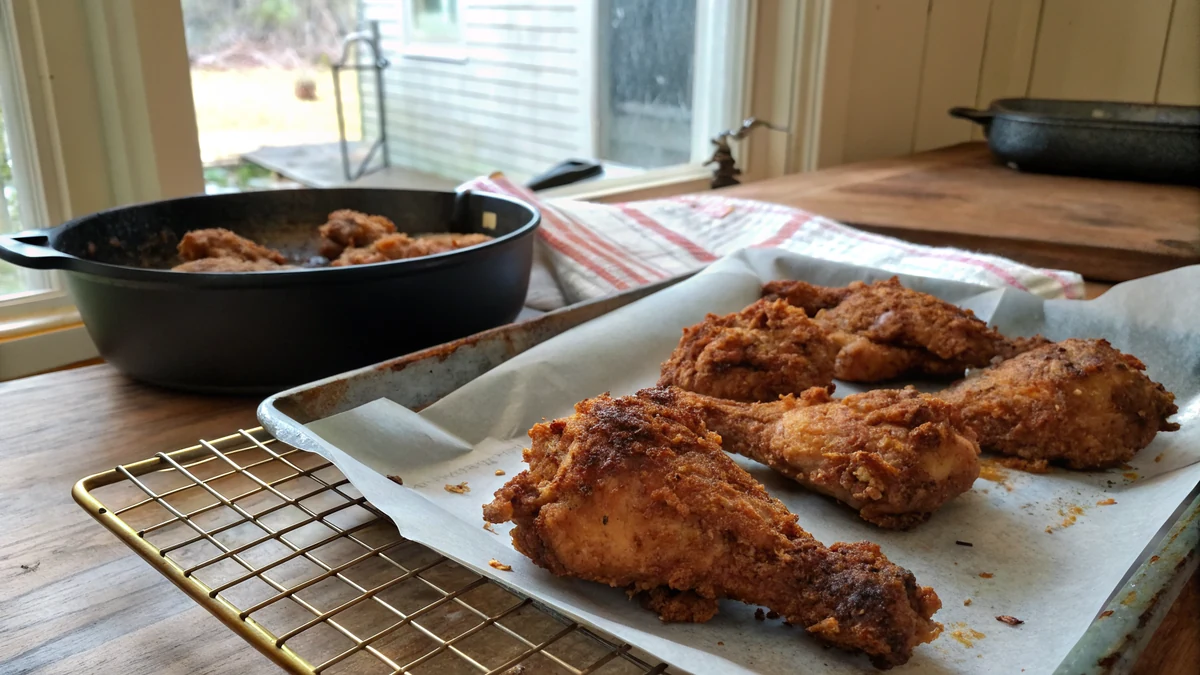
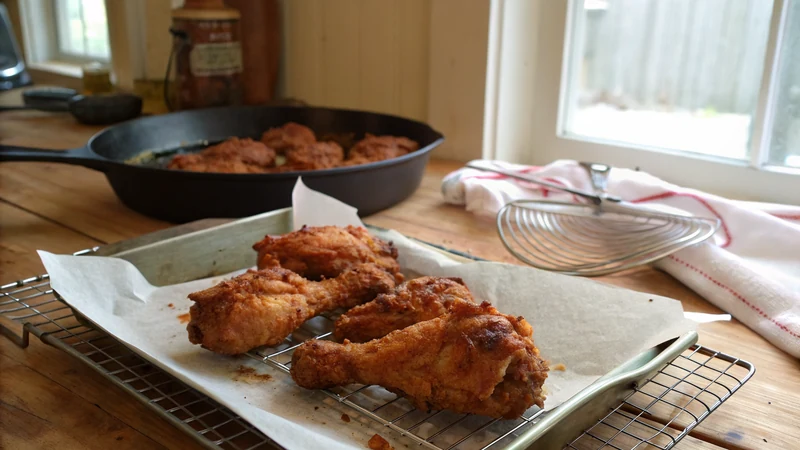
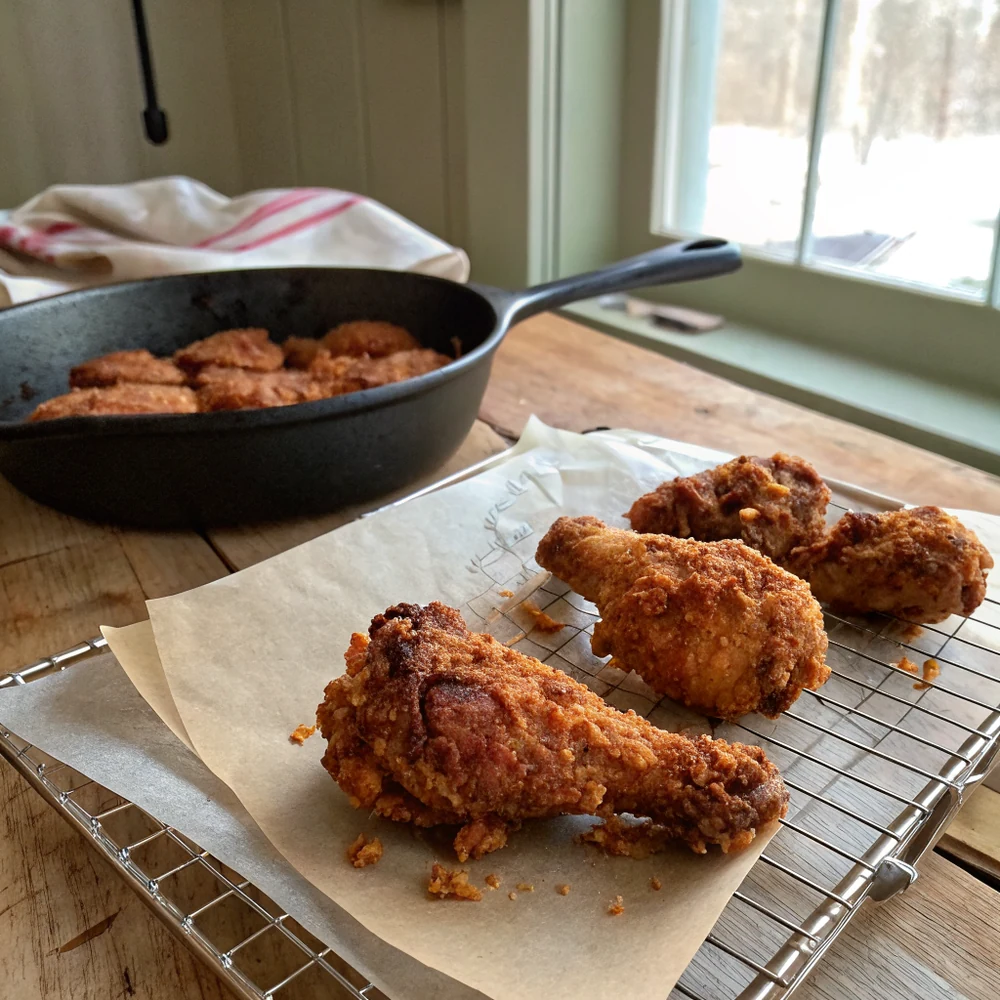
Rest on a Wire Rack, Not Paper Towels
This is the single most overlooked step in home fried chicken, and it is the difference between mahogany and soggy. Hot fried chicken set on paper towels will go soggy on the bottom in 90 seconds: the towel traps the steam coming off the chicken's surface, the steam recondenses against the crust, and the crust softens. By the time you sit down to eat, the bottom of every piece is wet and disappointing.
A wire rack set over a sheet pan lets the steam escape downward and air circulate around the entire piece. The crust stays crisp on every surface. Rest the chicken on the rack for 5-10 minutes before serving - this lets the juices redistribute through the meat (the same way you rest a steak) and lets the crust set into its final crispness. The wait is hard. Do it anyway.
If you are frying in batches and need to keep early pieces warm, set the wire rack on the sheet pan in a 200F oven with the door slightly cracked. The low heat keeps the chicken at serving temperature without continuing to cook it, and the rack keeps the bottom crisp. Twenty minutes in a 200F warming oven is fine; longer and the chicken starts drying out.
My Hill Country Kitchen Notes
The first time I tried to fry chicken at home in my early twenties, I drained it on paper towels and ate the soggy result with confusion - my grandmother's chicken had never been like this. I called her from my apartment in Austin and she explained, with patience that I now appreciate, that the wire rack was non-negotiable and that paper towels were for blotting bacon, not for fried chicken. I have never made the mistake again, and the wire rack is now the first thing I set up in my kitchen before I even start the oil.
I keep my Lodge 12-inch cast iron skillet seasoned exclusively for fried chicken and cornbread. It does not get used for tomato sauce, eggs, or anything acidic. After the fry, the oil cools, I strain it through a coffee filter into a glass jar (it keeps for one more chicken fry, or for cornbread), and I wipe the skillet with a paper towel and a tablespoon of fresh oil. Twenty years on, the patina is glassy black. This is the same skillet care my grandmother used.
For sides, the Hill Country tradition is mashed potatoes and gravy, green beans (long-cooked with bacon), buttermilk biscuits, and pickled okra. I also love this with cornbread - the savory-sweet contrast is perfect. For a fuller spread, pair with Texas scalloped potatoes for a richer cheese-and-cream side. For the morning after, leftover fried chicken is excellent on a biscuit with a fried egg.
Mistakes to Avoid
Skipping the buttermilk brine. No brine, no fried chicken. Twenty-four hours is the target; less than 12 is not enough.
Using low-fat or powdered buttermilk. Full-fat cultured buttermilk only. The milk fat is part of the crust.
Frying cold chicken straight from the fridge. The oil temperature drops too far. Let the brined chicken come to room temperature for 30 minutes first.
Crowding the skillet. 4-5 pieces in a 12-inch is the limit. More and the oil temperature collapses and the chicken steams instead of fries.
Frying too hot. Above 325F the crust burns before the meat is cooked. Hold 300-310F throughout the fry.
Draining on paper towels. The single biggest soggy-chicken mistake. Wire rack over a sheet pan, every time.
Skipping the rest. Pull from oil, rest 5-10 minutes on the rack. The juices need to redistribute and the crust needs to set.
Re-using oil too many times. One re-use is fine for cornbread or another chicken fry. After that the oil oxidizes and the flavor turns.
Variations
Nashville hot. After frying, brush the chicken with a paste of 1/2 cup hot frying oil, 3 tablespoons cayenne, 1 tablespoon brown sugar, 2 teaspoons smoked paprika, 1 teaspoon garlic powder, and 1 teaspoon salt. Rest on a slice of white bread with bread-and-butter pickles on top. The Tennessee classic, lightly Texas-ified.
Spicy Texas. Bump the cayenne in the dredge to 1 tablespoon and add 1 teaspoon ground chipotle. The chicken gets a deeper smoky heat without crossing into Nashville hot territory.
Herbed Hill Country. Add 2 teaspoons dried thyme and 1 teaspoon dried sage to the dredge. The herb note plays against the buttermilk beautifully and makes a Sunday-supper version that feels slightly upscale.
Frenchy's-style Creole. Add 2 teaspoons of Tony Chachere's Creole Seasoning to the dredge in addition to the listed spices. The result leans toward the Houston Creole tradition - more layered seasoning, slightly more salt.
Boneless tenders. Use 2 lb of chicken tenderloins instead of a whole chicken. Same brine, same dredge; fry only 4-5 minutes per side at 325F. Serve as fried chicken biscuits or with hot honey.
Gluten-free version. Substitute the all-purpose flour with a 1:1 gluten-free flour blend (King Arthur Measure for Measure works). The crust is slightly more delicate but still very good. For a fuller GF spread pair with gluten-free breakfast casserole recipes.
What to Serve With Buttermilk Fried Chicken
Sunday-supper fried chicken sits at the center of a classic Hill Country plate: mashed potatoes with cream gravy, green beans long-cooked with bacon, buttermilk biscuits with butter and honey, and pickled okra or pickled jalapenos for cut-through acidity. The full plate is heavy on the carbs and richness, which is exactly the point - this is a once-a-week meal, not a weeknight one.
For a more contemporary spread, serve the fried chicken with a tangy slaw (cabbage, vinegar, mayo, hot sauce, mustard), watermelon wedges in summer, and cornbread or biscuits. A cornbread brisket sandwich on the same table is a full Texas spread (yes, both meats; this is a Texas Sunday). For the Southern method that started this whole tradition, the technique guide at Southern Living is the deepest archive on the internet.
For drinks, sweet tea is the canonical pairing. A cold lager (Shiner Bock or Lone Star) also works. For something more grown-up, a bourbon-and-soda highball pairs surprisingly well with the buttermilk and cayenne. For wine, a chilled rose or a high-acid white (Sauvignon Blanc, dry Riesling) cuts through the richness. For dessert: peach cobbler in summer, pecan pie in winter, banana pudding any time of year. When you want the same Sunday flavor without the fry, my baked BBQ chicken drumsticks are the easy weeknight swap.
Buttermilk Fried Chicken Recipe
Ingredients
- 1 whole chicken, 4 lb (1.8 kg), cut into 8 pieces (2 breasts halved, 2 thighs, 2 drumsticks, 2 wings)
- For the buttermilk brine:
- 1 quart (4 cups / 950 ml) full-fat cultured buttermilk
- 1/2 cup (120 ml) Frank's RedHot, Cholula, or Tabasco hot sauce
- 2 tablespoons kosher salt (Diamond Crystal; if using Morton's, use 1 tablespoon plus 1 teaspoon)
- 1 tablespoon granulated sugar
- 1 tablespoon coarsely ground black pepper
- 1 tablespoon garlic powder
- 1 tablespoon onion powder
- 2 teaspoons sweet paprika
- For the seasoned flour dredge:
- 3 cups (375 g) all-purpose flour
- 2 tablespoons cornstarch (for extra crispness)
- 1 tablespoon kosher salt
- 1 tablespoon smoked paprika
- 1 tablespoon garlic powder
- 1 tablespoon onion powder
- 2 teaspoons coarsely ground black pepper
- 2 teaspoons cayenne pepper (1 teaspoon for milder; 1 tablespoon for Nashville-leaning heat)
- 1 teaspoon dried thyme (optional)
- 1 teaspoon baking powder (helps the crust puff and lift)
- For frying:
- 6 cups (1.4 L) peanut oil, or enough to come 1 to 1.5 inches up the side of your skillet
- Equipment:
- 12-inch cast iron skillet, 2.5 to 3 inches deep (Lodge 12-inch is canonical)
- Instant-read thermometer (clip-on for the oil; probe for the chicken)
- Wire cooling rack set over a sheet pan (do not drain on paper towels)
Instructions
- Cut the chicken into 8 pieces. If your chicken is not already cut, lay it breast-up on a cutting board. Remove the legs at the hip joint, separate thigh from drumstick at the knee joint, remove the wings at the shoulder joint, then split the breast in half lengthwise along the breastbone and cut each breast crosswise into a roughly equal upper and lower half. You should have 8 pieces: 2 breast halves (cut crosswise into 4 pieces), 2 thighs, 2 drumsticks, 2 wings. Save the back and neck for stock. Pat the pieces dry with paper towels.
- Mix the buttermilk brine and brine 24 hours. In a large bowl or 1-gallon zip-top bag, whisk together the buttermilk, hot sauce, kosher salt, sugar, black pepper, garlic powder, onion powder, and sweet paprika. Add the chicken pieces and submerge them fully (push out the air from the bag and seal). Refrigerate for 24 hours, ideally not less than 12 and not more than 36. The buttermilk's lactic acid slowly tenderizes the meat by gently breaking down protein bonds, while the salt seasons through to the bone and the hot sauce contributes vinegar acidity and flavor depth. This is where the magic happens.
- Drain and let come to room temperature. Pull the chicken from the refrigerator 30-45 minutes before frying. Lift each piece from the buttermilk, letting most (but not all) of the brine drip off, and set on a wire rack over a sheet pan. You want a thin film of buttermilk clinging to the chicken; this is what the flour dredge sticks to. Do not rinse the chicken. Do not pat it bone-dry. Let the pieces sit at room temperature for 30 minutes while you set up the dredge - cold chicken into hot oil drops the temperature too far and the crust will be greasy.
- Mix the seasoned flour dredge. In a wide shallow bowl or a 9x13 baking dish, whisk together the flour, cornstarch, kosher salt, smoked paprika, garlic powder, onion powder, black pepper, cayenne, dried thyme, and baking powder. Spoon 3 tablespoons of the buttermilk brine into the flour and use your fingertips to rub it in - this creates small craggy lumps in the flour, which become the shaggy crispy bits on the finished crust. (This is the Babe's Chicken Dinner House trick.) The dredge should look like flour with sandy clumps scattered through it.
- Dredge the chicken (double-dredge for extra crisp). Working one piece at a time, lift a piece of chicken from the wire rack and press it firmly into the seasoned flour, turning to coat all sides. Press the flour into the chicken with your palms - you want full coverage, including the underside. For a single-dredge version, set the floured piece back on the wire rack and continue. For a <strong>double-dredge</strong> (crispier, more textured crust): dip the floured piece briefly back into the buttermilk brine, then return it to the flour and coat again. Set on the wire rack and let the dredge hydrate for 10-15 minutes - the surface should look slightly damp and tacky. This rest is essential; it is what lets the crust adhere to the chicken instead of sloughing off in the oil.
- Heat the peanut oil to 325F in cast iron. Set a 12-inch cast iron skillet on the stove over medium heat. Pour in enough peanut oil to come 1 to 1.5 inches up the side (about 6 cups in a standard 12-inch Lodge). Clip an instant-read thermometer to the side of the skillet so the tip is in the oil but not touching the bottom. Heat the oil to 325F (165C). This takes 8-12 minutes; do not rush. The oil should shimmer but not smoke. If you do not have a thermometer, drop a pinch of flour into the oil - it should sizzle immediately and rise to the surface within a second, but not burn.
- Fry skin-down 8-10 minutes, flip, fry 8-10 more. Carefully lay the chicken pieces in the oil skin-side down, starting with the thighs and drumsticks (which take longer) and then adding breasts and wings. Do not crowd the skillet - 4 to 5 pieces at a time is right for a 12-inch skillet; fry in two batches if needed. The oil temperature will drop to about 300F when the cold chicken hits; this is correct. Maintain a steady 300-310F by adjusting the heat (medium-low for most stoves). Fry skin-side down for 8-10 minutes until the bottom is deep golden brown. Flip with tongs (do not pierce with a fork; you lose juice) and fry the second side for another 8-10 minutes. Total fry time per batch: 16-20 minutes. Internal temperature must reach 165F (74C) at the thickest part of the thigh and 160F at the breast (carryover takes it to 165F).
- Drain on a wire rack and rest 5-10 minutes. Transfer the cooked chicken to a wire rack set over a sheet pan. <strong>Do not drain on paper towels.</strong> The bottom of the chicken steams against the towel and the crust goes soggy in 90 seconds. A wire rack lets air circulate underneath, keeping the crust crisp on all sides. Rest the chicken for 5-10 minutes before serving - this lets the juices redistribute through the meat and lets the crust set. Sprinkle with a pinch of flaky salt if you like. Serve hot, warm, or at room temperature.
Frequently Asked Questions
How long should I brine chicken in buttermilk?
Twenty-four hours is the sweet spot for a 4-pound chicken cut into 8 pieces. Less than 12 hours and the buttermilk's lactic acid has not penetrated past the surface; more than 36 hours and the chicken's surface starts to break down too much (the texture goes mushy). At 24 hours the meat is fully tenderized, seasoned to the bone, and structurally sound for the dredge. Brine in the refrigerator the entire time, never at room temperature, and use full-fat cultured buttermilk - not low-fat, not powdered, not made-with-vinegar buttermilk substitute.
Why use cast iron instead of a deep fryer?
Cast iron holds heat exceptionally well, which keeps the oil temperature stable when cold chicken hits it. A standard skillet or thin Dutch oven loses too much heat and the chicken fries in cool oil and turns greasy. Cast iron is also the Texas Hill Country tradition - my grandmother fried chicken in the same Lodge 12-inch she used for cornbread and chicken-fried steak, and the patina built up over decades is part of the flavor. A deep fryer works mechanically but the chicken comes out tasting more uniform and less interesting; cast iron pan-frying gives you the mahogany bottom and the lighter golden top.
What oil is best for frying chicken?
Peanut oil is the Texas standard - high smoke point (450F), clean and slightly nutty flavor, exceptionally crisp golden crust. Most Hill Country cooks use peanut oil and most Texas chicken houses (Babe's, Bubba's, Lucy's) fry in peanut oil. Lard is the older Southern tradition and produces a more flavorful chicken if you have access to good leaf lard. Crisco shortening was the mid-20th-century standard and works fine but is more neutral. Avoid olive oil (smoke point too low) and sesame oil (flavor too strong). Vegetable, canola, or sunflower oil are all acceptable substitutes.
Why does my fried chicken crust fall off in the pan?
Three reasons, in order of likelihood. First, you did not let the dredged chicken rest 10-15 minutes before frying - the flour needs that time to hydrate with the buttermilk on the surface and form a sticky paste that fries up into a unified crust. Second, your oil was too cold when the chicken went in - below 290F the dredge slides off before the crust sets; aim for 325F to start. Third, you flipped the chicken too early or too aggressively. Let the bottom go fully mahogany (8-10 minutes) before flipping, and use tongs to flip gently - do not pierce the chicken or scrape the crust against the pan.
What temperature should the oil be?
Heat the oil to 325F (165C) before adding the chicken. The cold chicken will drop the temperature to about 300F immediately, and the goal is to hold a steady 300-310F for the entire fry. Below 290F means greasy chicken (oil soaks into the crust before it sets); above 320F means burned crust before the meat is cooked. Use a clip-on thermometer in the oil and adjust the burner constantly throughout the fry. The internal temperature of the cooked chicken should reach 165F (74C) at the thickest part of the thigh and 160F at the breast (carryover takes it to 165 during the rest).
Why should I drain on a wire rack instead of paper towels?
Paper towels trap the steam coming off the just-fried chicken, the steam recondenses against the crust, and the bottom of every piece goes soggy within 90 seconds. A wire rack set over a sheet pan lets the steam escape downward and air circulate around the entire piece - the crust stays crisp on every surface. This is the single most overlooked step in home fried chicken and the difference between mahogany-and-shattering and damp-and-disappointing. Always rest on a wire rack for 5-10 minutes before serving so the juices redistribute and the crust sets.
Can I make buttermilk fried chicken ahead?
Yes, with caveats. The brining must be done 12-24 hours ahead - that is built into the recipe. The frying is best done within an hour of serving; fried chicken straight from the skillet is dramatically better than reheated. If you must hold it: rest fried chicken on a wire rack in a 200F oven with the door cracked for up to 30 minutes, the crust stays crisp. To reheat fully cooled fried chicken, set it on a wire rack over a sheet pan in a 375F oven for 12-15 minutes - the crust re-crisps and the meat re-warms. Do not microwave fried chicken; the crust goes soggy in seconds.