Texas BBQ
Fall Off the Bone Ribs Copycat
Chef Mia's fall off the bone ribs, a Texas Roadhouse copycat. Oven-baked baby back pork ribs, low and slow, with a smoky rub and a sticky BBQ glaze.
Quick answer: To make fall off the bone ribs like Texas Roadhouse, peel the membrane off two racks of baby back pork ribs, then coat them in a dry rub of brown sugar, smoked paprika, chili powder, garlic and onion powder, kosher salt, black pepper, and a little cayenne. Wrap each rack tightly in foil and bake low and slow at 275 degrees for about 2.5 to 3 hours until the meat is tender and pulls back from the bones. Unwrap, brush generously with BBQ sauce, and broil or grill 5 to 8 minutes to caramelize the glaze. Rest 10 minutes before slicing between the bones.
Texas Roadhouse ribs have a reputation, and it is earned. They are tender enough that the meat slides right off the bone, but they still have that sticky, slightly charred BBQ glaze on the outside that makes you lick your fingers. For years I tried to chase that texture on a grill and kept ending up with ribs that were either tough or falling apart into mush. The fix turned out to be simple and a little boring: low heat, a tight foil wrap, and patience. Once I started baking my baby back pork ribs at 275 degrees and finishing them under the broiler, I stopped missing the restaurant version entirely.
I want to be clear from the start that this is a pork recipe. These are baby back ribs, the curved, leaner ribs that come from up near the spine, and they cook differently than beef ribs do. If you came here for beef, I will point you in the right direction further down, because I keep separate recipes for those. But if you want that classic Roadhouse plate, tender pork ribs with a caramelized BBQ crust, made in your own oven with no smoker required, you are in exactly the right place. This is the method I make for every cookout, every birthday, and most lazy Sundays.
Why These Taste Like Texas Roadhouse
What makes the Roadhouse ribs special is not some secret ingredient. It is the texture and the finish working together. The meat is cooked long enough at a low temperature that it goes completely tender, almost spoon-soft between the bones, and then the outside gets that sticky, slightly charred BBQ glaze that contrasts with the soft meat underneath. Most home cooks miss one or the other. They either get the glaze right but leave the meat tough, or they get the meat tender but skip the caramelized crust. You need both.
My method gives you both with no special equipment. The low oven and the foil wrap handle the tenderness. The dry rub builds layered, smoky flavor right into the meat over those long hours. Then the broiler, or a hot grill if you have one going, does the work of caramelizing the sauce into a glossy, tacky crust at the very end. It is the same three-part logic a barbecue joint uses, just scaled down to a home oven and a sheet pan.
The rub is doing more than you might think. Brown sugar helps the bark caramelize, smoked paprika fakes that kissed-by-the-smoker flavor, and the chili powder, garlic, onion, and a touch of cayenne round it into something that tastes like a real Texas rib. Roadhouse ribs lean a little sweet, so the brown sugar in both the rub and the BBQ sauce is intentional. If you like things less sweet, you can pull back the sugar, but you will be drifting away from the copycat target.
And the BBQ sauce choice matters at the end. Use whatever sauce you genuinely love, because it is the loudest flavor on the finished rib. I usually reach for a thick, sweet, slightly smoky sauce, since that is closest to the Roadhouse profile. A thin, vinegary Carolina-style sauce will not cling or caramelize the same way. Whatever you pick, you want one with some sugar in it so it sets up into that sticky glaze under the heat.
Picking the Right Ribs
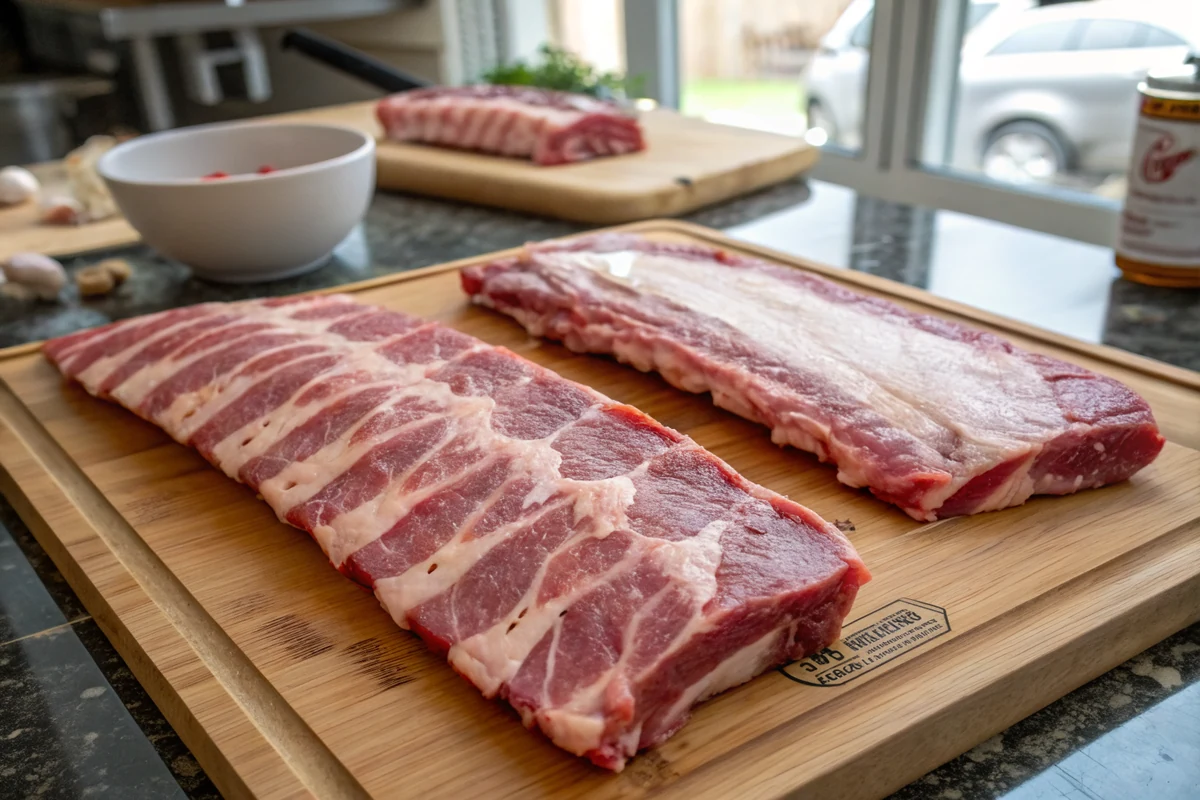
This recipe is built for baby back pork ribs, so let me explain what those are and why they matter here. Baby backs come from the top of the pig's ribcage, up near the spine where the loin sits. They are shorter, curved, and leaner than spare ribs, with tender meat right on top of the bones. A typical rack runs about 1.5 to 2.5 pounds, which is why two racks lands you around 4 to 5 pounds total and feeds about four hungry people as a main.
You can use this same method on St. Louis style spare ribs, which are meatier, flatter, and a bit fattier. They taste fantastic, but they are bigger and need a little more time, usually pushing toward the full 3 hours or even a touch beyond. If you swap to spares, just lean on the tenderness check rather than the clock. For the truest Roadhouse copycat, though, I stick with baby backs, because that leaner, tender bite is what the restaurant serves.
One thing I want to clear up is that these are pork ribs, not beef. Beef ribs are a whole different animal, literally. They are bigger, beefier, and they shine with different methods. If you are weighing your options, I wrote a full breakdown on the difference over at my beef vs pork ribs guide, which walks through cut by cut what to expect from each. For this particular fall off the bone, oven and broiler approach, baby back pork ribs are the move.
Removing the Membrane
If you do one thing right with ribs, make it this. On the bone side of every rack there is a thin, papery silver membrane called the pleura. It is tough, it never breaks down no matter how long you cook, and it blocks both the rub and the smoke flavor from getting into the back of the meat. Leave it on and you end up gnawing through a chewy film on every bite. Take it off and the whole rack eats better and absorbs more seasoning.
The technique is simple once you have done it once. Flip the rack bone-side up, find a back bone near the middle, and slide a butter knife or a spoon handle under the membrane to lift an edge. Once you have a flap, grab it with a dry paper towel for grip and pull it back across the rack. Sometimes it peels off in one clean sheet, which is deeply satisfying. Sometimes it tears and you have to start a new edge and pull again.
Do not panic if it fights you. Cold ribs release the membrane more easily, so work with them straight from the fridge. If a stubborn rack just will not give it up, you can score the membrane in a crosshatch pattern with a knife so it at least does not seize and curl during cooking, but pulling it off fully is always better. Many butchers will remove it for you if you ask when you buy the ribs, so it never hurts to request that at the counter.
Skipping this step is the most common mistake I see, and it is the easiest one to avoid. It takes about a minute per rack. Once you have peeled a few, you will do it without thinking. The difference in the finished ribs, in how the rub flavors the meat and how tender the back of the rack eats, is well worth that single minute of fiddling with a slippery sheet of pork membrane.
Building the Dry Rub
The rub is where the flavor starts, and mine is built to echo that sweet, smoky Roadhouse profile. The base is a quarter cup of packed brown sugar, which does two jobs. It seasons the meat with a mellow sweetness, and it helps the surface caramelize into a bark during the bake and again under the broiler. Sugar plus heat equals that deep, slightly sticky crust. It is the backbone of the whole rub, so do not skimp on it.
From there I layer in the savory and smoky notes. A tablespoon of smoked paprika is the workhorse, because it brings real smokehouse flavor to ribs that never touch a smoker. A tablespoon of chili powder adds warmth and a little complexity, while two teaspoons each of garlic and onion powder build that savory, almost meaty depth. Kosher salt, a tablespoon and a half, seasons the meat all the way through, and black pepper adds a gentle bite. Mix it all in a bowl until the color is even.
The cayenne is your heat dial. A quarter teaspoon gives a barely-there background warmth that most folks read as flavor, not spice. If you want real heat, push it to half a teaspoon or a full one. If you are feeding kids or spice-shy guests, you can leave it out entirely and the ribs are still delicious. The rest of the rub carries plenty of character on its own. This is the easiest place to tune the recipe to your own table.
Apply the rub generously and press it in. Pat the racks dry first so the seasoning grips the meat instead of sliding off, then coat both sides and the edges, working it in with your hands until every surface has a full, even layer. You can rub the ribs and bake right away, or for deeper flavor, wrap the rubbed racks and let them sit in the fridge for a few hours or overnight. Both work. I usually rub and go, because these ribs do not need help tasting great.
The Low and Slow Science
Low and slow is not just a barbecue catchphrase, it is the actual chemistry that makes ribs tender. Rib meat is full of tough connective tissue, mostly collagen, that holds the muscle to the bone. At high heat that collagen seizes up and squeezes the meat dry. But hold the meat at a gentle 275 degrees for a couple of hours and the collagen slowly melts into soft, silky gelatin. That gelatin is what coats your mouth and makes the meat feel rich and tender.
This is why I never rush ribs by cranking the oven. Going hot and fast might cook the meat through, but it leaves all that connective tissue tough and chewy. The transformation from collagen to gelatin needs both time and moderate, steady heat. There is no shortcut. The two and a half to three hours is not me being fussy, it is the actual time the conversion takes at this temperature. Trust the process and you get ribs that pull apart like the restaurant version.
The same principle is why beef ribs and other tough cuts get cooked for hours in low ovens, smokers, and slow cookers. If you have ever wanted the totally hands-off route, a slow cooker does this collagen magic beautifully, and I lay out the whole approach in my beef back ribs slow cooker recipe. The cut and the seasoning differ, but the low-and-slow logic is identical. Gentle heat plus time turns tough into tender, every single time, whether it is pork or beef.
A quick note on temperature accuracy. Ovens lie, sometimes by 25 degrees or more, so if your ribs come out consistently tough or consistently mushy, an oven thermometer is a cheap fix that tells you what is really going on inside. Aim for a true 275. A little hotter and you risk drying the edges before the centers tenderize. A little cooler and you just need to add time. Steady, moderate heat is the whole game here.
The Foil Wrap That Does the Work
The tight foil wrap is the trick that takes ribs from merely tender to genuinely fall off the bone. When you seal each rack in a crimped foil packet, the moisture that comes off the meat is trapped inside, so the ribs essentially braise and steam in their own juices as they bake. That moist environment speeds up the collagen breakdown and keeps the meat from drying out over those long hours. Without the foil, the surface dries and the meat tightens up.
Crimp the seams well. You want a sealed packet, not a loose tent, because any gap lets steam escape and you lose the whole benefit. I use heavy-duty foil, and if all I have is the thin stuff, I double-wrap so a sharp bone tip does not punch a hole and leak juices onto the pan. Always set the packets on a rimmed baking sheet too, just in case a seam gives, because rib juice baked onto your oven floor is a smoky, miserable cleanup.
A small but real tip: some folks add a splash of liquid inside the foil, like apple juice, cola, or a little cider vinegar, to build extra steam and flavor. It is not required, since the ribs make plenty of their own moisture, but it is a nice touch if you want it. I keep mine simple most of the time and let the rub and the meat juices do the talking. The foil itself is the part that matters. That sealed steam chamber is non-negotiable for this texture.
When the time is up, open the packets carefully. The trapped steam comes out hot and fast, so peel the foil away from you to avoid a burn. You will see a pool of rendered juices and rub in the bottom of each packet. That liquid is flavor. I sometimes pour a little into my BBQ sauce, or I set it aside. Either way, lift the racks out gently, because at this point they are tender enough to start falling apart in your hands.
Saucing and the Broiler Finish
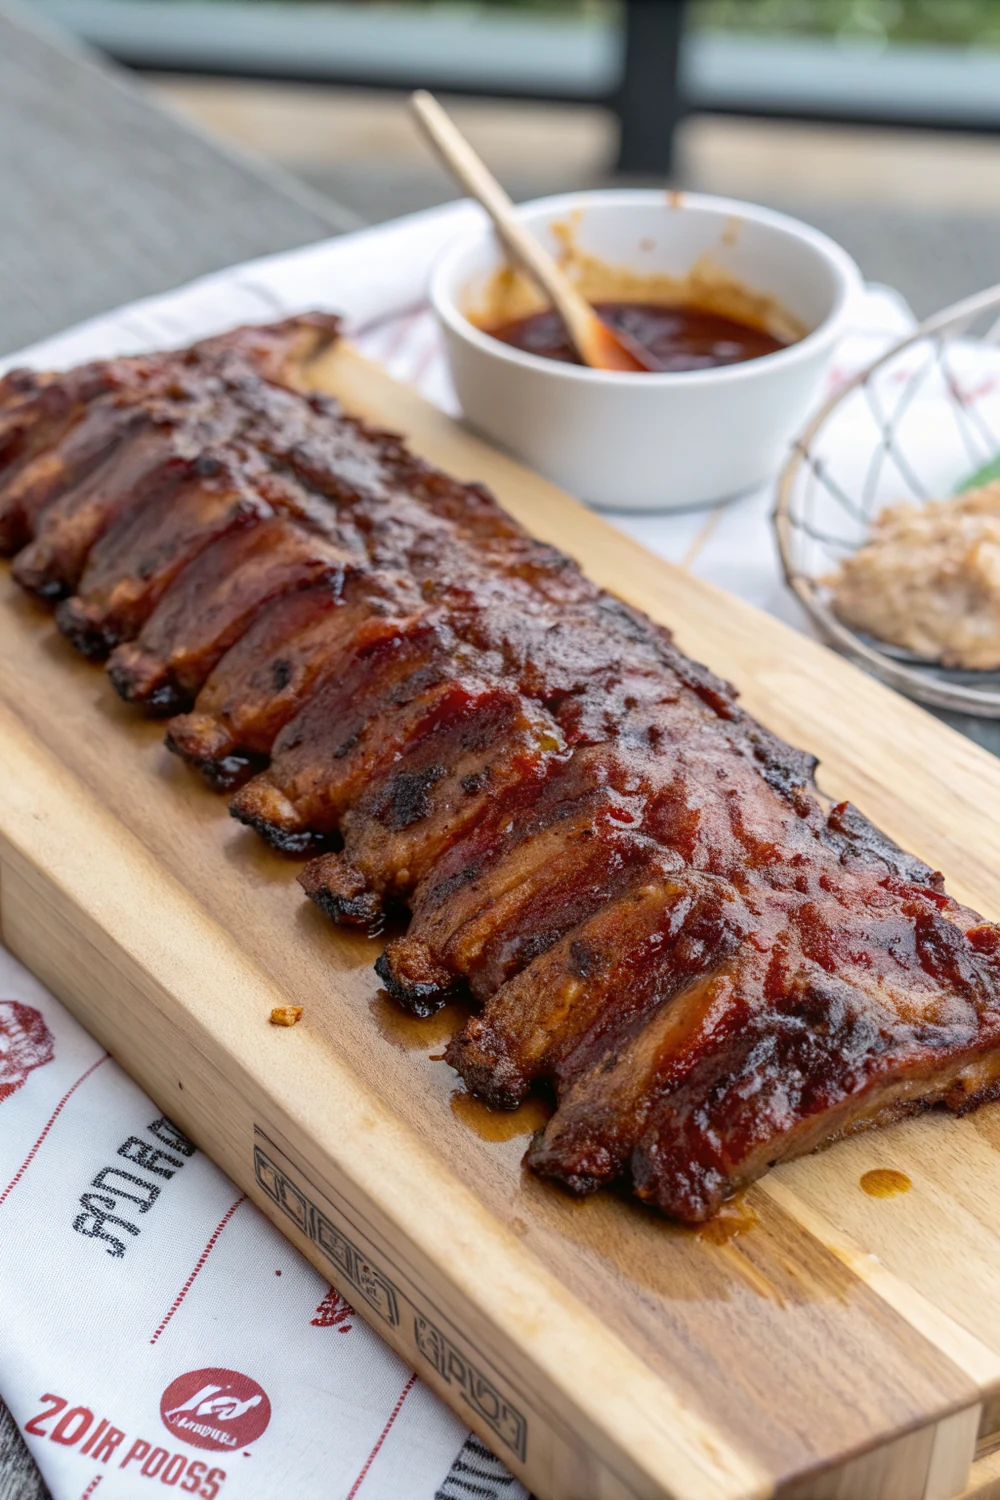
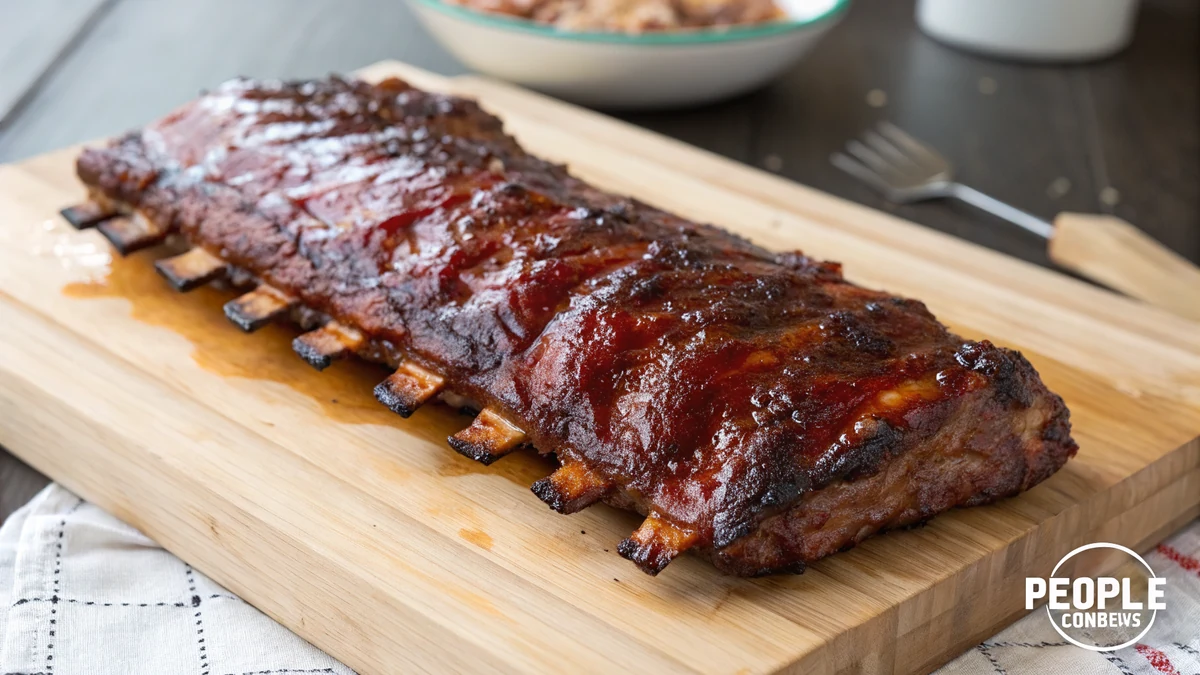
Here is where tender ribs become Roadhouse ribs. Once the racks are fall-apart tender out of the foil, move them to a foil-lined sheet pan and brush them all over with BBQ sauce. Use a sauce you love and one with some sugar in it, because that sugar is what caramelizes. Apply a generous but even coat over the top and sides. Too thin and you miss the sticky crust, too thick and the sauce slides off in a gloppy layer that never sets. Aim for full, even coverage.
Then comes the heat. A high broiler with the rack in the upper third of the oven will caramelize that sauce in about 5 to 8 minutes, but you have to babysit it. The sugar in BBQ sauce goes from beautifully tacky and charred to scorched and bitter in under a minute if you walk away. Stay right there and watch for the glaze to bubble, darken, and develop a few caramelized spots. The moment it looks sticky and glossy with some char, pull it out.
If you have a grill going, that is an even better finish, and honestly closer to the restaurant. Lay the sauced ribs over medium heat, brush on a second coat halfway through, and let the flames char the edges. The grill adds a real smoky note the oven cannot. Either way, two thin coats of sauce build a better glaze than one thick coat, because each layer gets a chance to set before the next goes on. Patience pays off in stickiness.
One thing I have learned the hard way: do not sauce the ribs before or during the long bake. If you wrap saucy ribs in foil for three hours, the sugar just dissolves into the juices and you lose the whole point of the glaze, plus it can scorch. The sauce belongs at the very end, when high, direct heat can do its caramelizing work fast. Rub goes on at the start, sauce goes on at the finish. That order is the difference between sticky and soggy.
How to Know They Are Done
Ribs do not have a single magic internal temperature the way a steak or a chicken breast does. Technically pork ribs are safe to eat at 145 degrees, but at that point they are still tough as a boot. The tenderness you actually want does not happen until the meat hits somewhere around 195 to 203 degrees, where the collagen has fully turned to gelatin. So instead of chasing a number, you learn to read the physical signs, which is more reliable anyway.
The first sign is bone pullback. As the ribs cook, the meat shrinks and slides up the bones, exposing about a quarter inch of clean bone tip at the ends. The second is the toothpick test. Slide a toothpick or a thin skewer into the meat between two bones. When it goes in and out with almost no resistance, like poking softened butter, the ribs are tender. If it drags or feels stiff, they need more time in the foil.
The third sign is the bend test, my favorite. Lift the rack from one end with a pair of tongs. A fully cooked rack will bow downward and the surface will start to crack and split between the bones. If it stays stiff and flat, it is not ready. If it nearly falls apart when you lift it, you have hit true fall off the bone territory. With baby backs, that usually lands around the 2.5 hour mark, but always trust the signs over the clock.
If you check and the ribs are not there yet, do not stress. Just reseal the foil packet and put them back in for another 20 to 30 minutes, then check again. Ribs are forgiving in the low oven, and a little extra time only makes them more tender, up to a point. The only real risk is going so far that the meat turns to mush and slides off before you can even sauce it. The signs above keep you right in the sweet spot.
What to Serve With Ribs
Ribs are rich and a little sweet, so I build the plate to balance that. The Roadhouse move is a basket of soft rolls and a side of something starchy and comforting. Creamy mashed potatoes are my go-to, because they catch the extra BBQ sauce that pools on the plate. Buttery corn on the cob, mac and cheese, or a scoop of baked beans all land right in that classic cookout zone and round the meal into a proper feast.
I always want something fresh and acidic on the plate too, because the ribs are heavy. A crisp, tangy coleslaw is the perfect partner, since the cool crunch and the vinegar cut straight through the rich, sticky meat. A simple green salad with a sharp vinaigrette does the same job. That contrast between the soft, sweet ribs and a bright, crunchy slaw is, to me, what makes a rib plate feel complete instead of just heavy.
For a bigger spread, especially if you are feeding a crowd at a cookout, I lean Texan. A pot of pinto beans, some cornbread, grilled corn, and a pitcher of sweet tea turns a rack of ribs into a backyard party. Pickles, sliced onion, and extra BBQ sauce on the table let everyone build their plate their way. Ribs are inherently social food, so I cook a lot and put plenty of sides out and let people go to town.
And do not forget extra napkins and a side of BBQ sauce for dipping. These are messy ribs, gloriously so, and trying to keep things tidy just gets in the way of the fun. I put a roll of paper towels right on the table. If I have leftover sauce, I warm it gently and set it out in a little bowl, because some people, myself included, want to drag every bite through a little more of that sweet, smoky glaze.
Storage, Reheating, and Beef Alternatives
Leftover ribs keep well, which is a small miracle since they rarely last in my house. Let them cool, then wrap tightly or store in an airtight container in the fridge for up to four days. They also freeze beautifully. Wrap cooled racks or portions in foil, then a freezer bag, and freeze for up to three months. Thaw overnight in the fridge before reheating. Honestly, ribs are one of the few leftovers I get genuinely excited about the next day.
The trick to reheating ribs is gentle, moist heat so they do not dry out. My method is to wrap them in foil with a splash of liquid, apple juice or water works, and warm them in a 275 degree oven until heated through, usually 20 to 30 minutes. Then I unwrap, brush on a little fresh BBQ sauce, and run them under the broiler for a couple of minutes to re-crisp the glaze. They come back almost as good as fresh. Avoid the microwave if you can, since it makes the meat tough.
If you read all this and realized you actually want beef, I have you covered. Beef ribs are a bigger, richer experience, and they deserve their own treatment. For a true Texas-style smoked version with that deep bark and beefy bite, head over to my smoked beef ribs, which walks through the dino-plate beef ribs low and slow. And if you want the totally hands-off route, the beef back ribs slow cooker method gives you tender beef ribs with almost no babysitting.
But for that specific Texas Roadhouse craving, the tender pork rib with the sticky, sweet, broiler-caramelized glaze, these baby backs are the answer. No smoker, no special gear, just an oven, some foil, a good rub, and a sauce you love. Once you make them this way a couple of times, you will have the timing in your bones, and you will stop ordering ribs out, because the homemade version is better and costs a fraction of the price.
Fall Off the Bone Ribs Copycat Recipe
Ingredients
- For the ribs:
- 2 racks baby back pork ribs (about 4 to 5 lb total)
- For the dry rub:
- 1/4 cup brown sugar, packed
- 1 tablespoon smoked paprika
- 1 tablespoon chili powder
- 2 teaspoons garlic powder
- 2 teaspoons onion powder
- 1 1/2 tablespoons kosher salt
- 1 teaspoon black pepper
- 1/4 teaspoon cayenne pepper (more if you like heat)
- For finishing:
- 1 to 1 1/2 cups BBQ sauce (store-bought or homemade), for glazing
Instructions
- Remove the membrane. Flip each rack bone-side up. Slide a butter knife under the thin, shiny membrane along one of the middle bones, lift it, then grab it with a paper towel and peel the whole sheet off in one pull. This membrane never softens and it blocks the rub from getting into the meat, so taking it off is the single most important prep step. If it tears, just get a new grip and keep pulling until the back of the rack is clean and exposed.
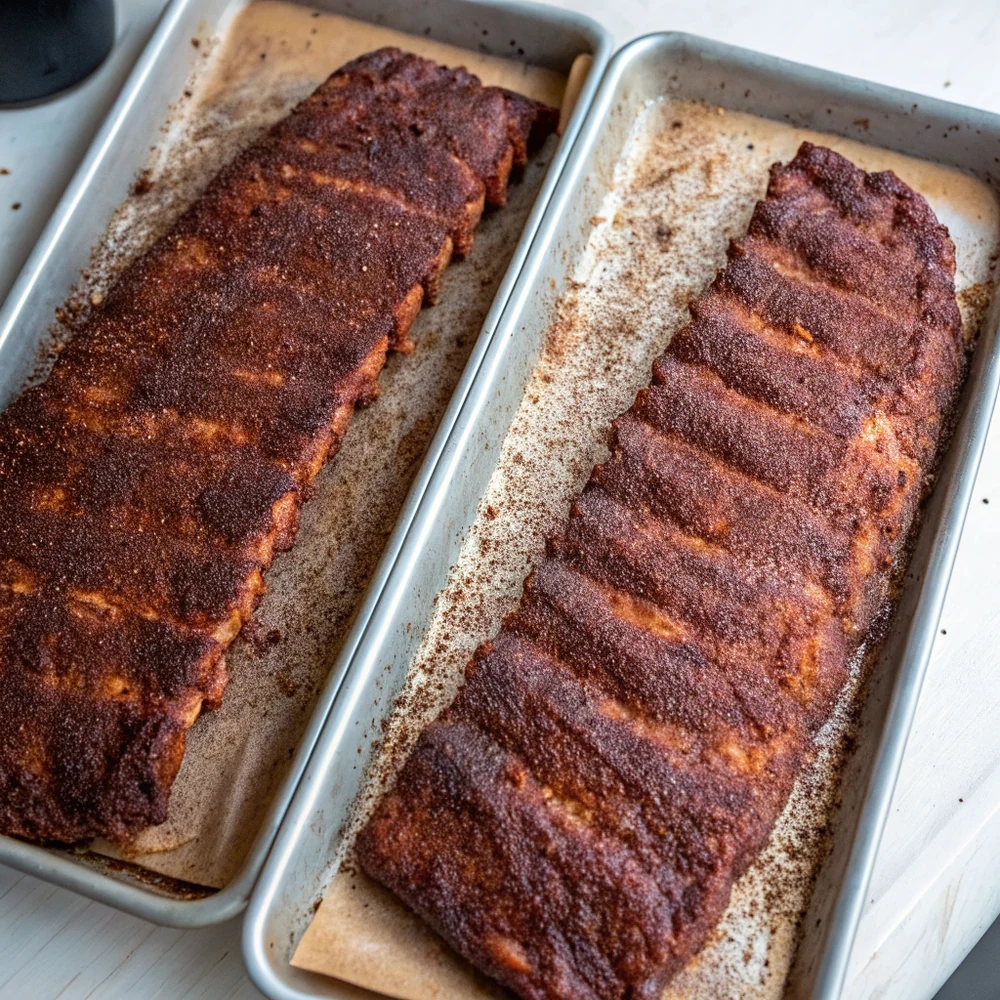
- Mix and apply the rub. Stir the brown sugar, smoked paprika, chili powder, garlic powder, onion powder, kosher salt, black pepper, and cayenne together in a bowl until evenly blended. Pat the ribs dry with paper towels so the rub sticks. Sprinkle the rub generously over both sides of each rack and press it into the meat with your hands. Coat the edges too. You want a full, even layer all over, because this is the foundation of both the flavor and the bark on the finished ribs.
- Wrap tightly in foil. Lay out a long sheet of heavy-duty foil for each rack. Set the ribs meat-side up in the center and fold the foil over, crimping all the seams tightly so no steam escapes. The sealed packet is what turns these into fall off the bone ribs, because the trapped moisture gently steams the meat as it bakes. If your foil is thin, use two layers so a stray bone tip does not poke a hole and let your juices leak out onto the pan.
- Bake low and slow. Set the foil packets on a rimmed baking sheet and bake at 275 degrees for about 2.5 to 3 hours. Baby back ribs usually need closer to 2.5 hours, but thicker racks can take the full 3. You are not watching a timer so much as a texture. Low, steady heat slowly breaks down the tough collagen between the bones into soft gelatin, which is exactly what makes the meat tender. Resist the urge to crank the temperature to rush it.
- Check for tenderness. Carefully open one packet, watching for the burst of hot steam. The ribs are ready when the meat has pulled back to expose about a quarter inch of bone tips and a toothpick slides into the meat between the bones with almost no resistance. If you lift the rack with tongs and it bends and threatens to crack apart, you are there. If it still feels stiff, seal it back up and give it another 20 to 30 minutes before checking again.
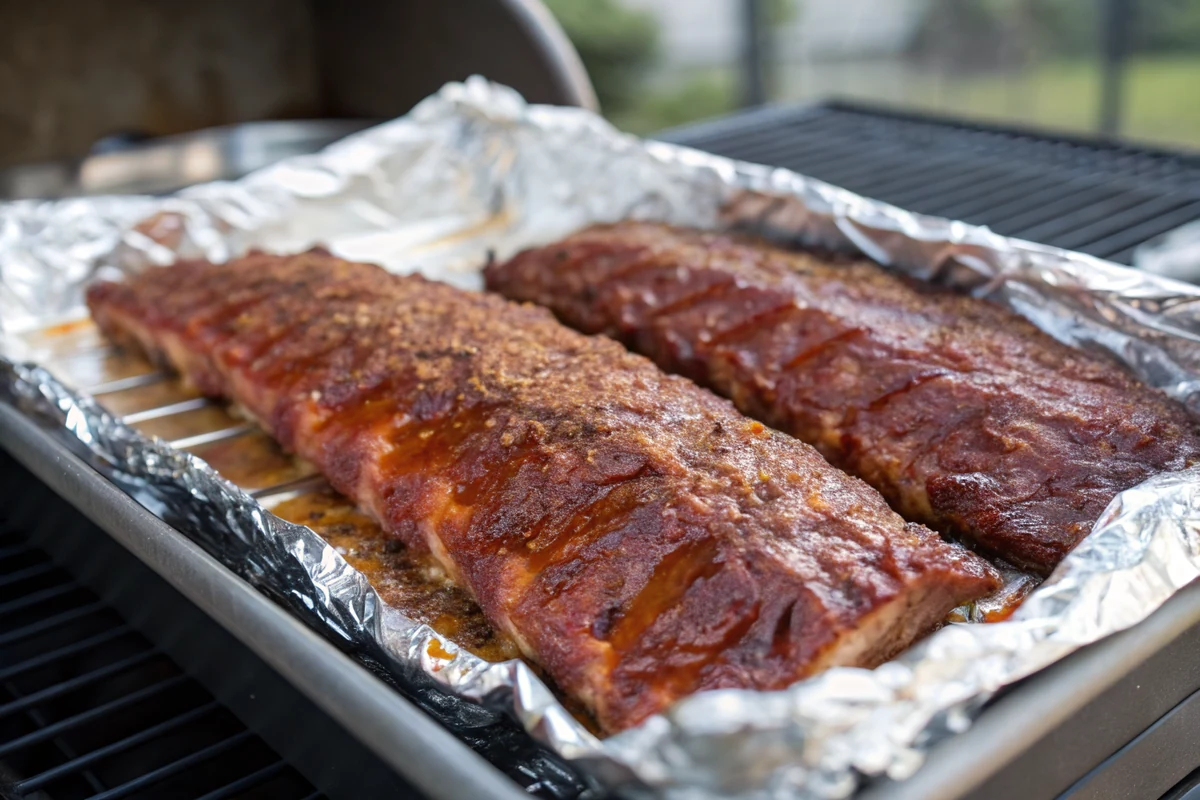
- Glaze the ribs. Unwrap the tender racks and move them, meat-side up, onto a foil-lined sheet pan. Pour off or set aside the juices in the packets. Brush a generous, even coat of BBQ sauce over the top and sides of each rack. Do not be shy, but do not drown them either, since a layer that is too thick will not set properly. This sauce is going to caramelize into that sticky, glossy crust everyone fights over, so cover every inch of the meat.
- Broil to caramelize. Set your oven to broil on high and position a rack in the upper third. Slide the sauced ribs under the broiler for about 5 to 8 minutes, watching them the entire time. The sugar in the sauce can go from caramelized to burnt fast. You want the glaze to bubble, darken, and turn tacky with a few charred spots. For a smokier finish, you can do this step on a hot grill instead, brushing on a second coat of sauce halfway through.
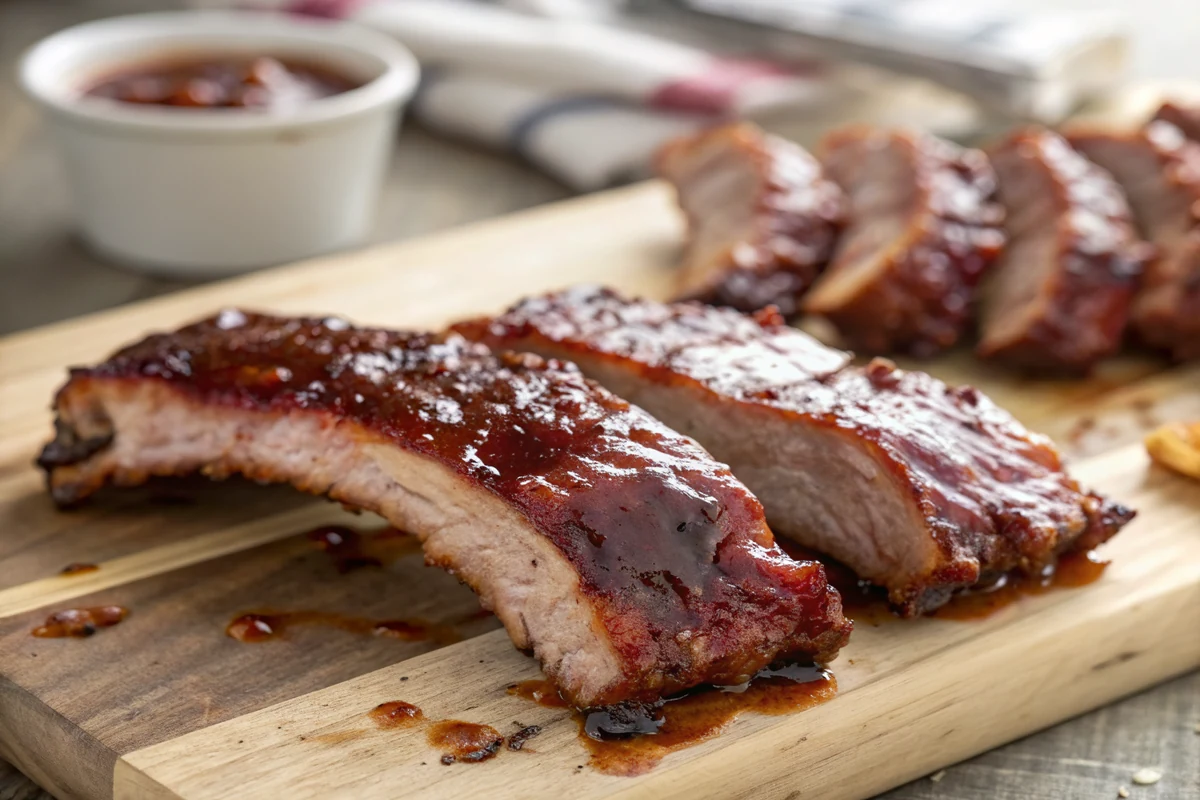
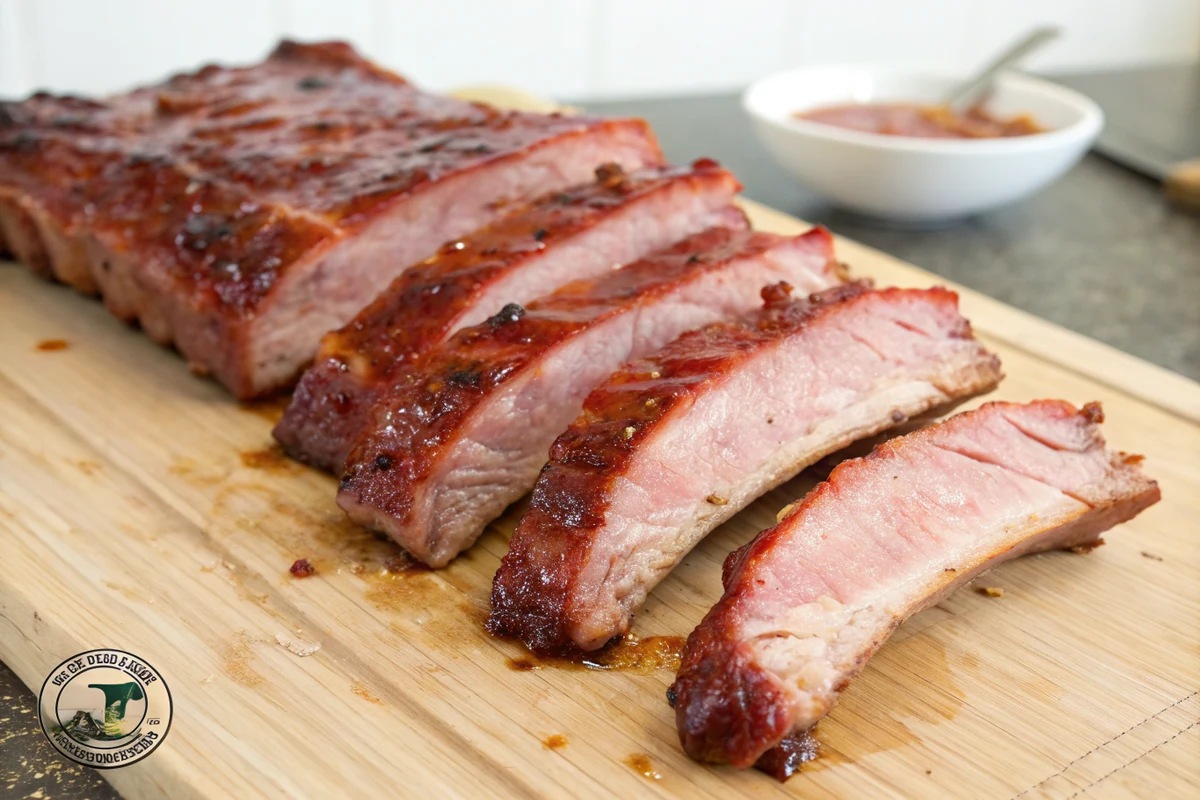
- Rest and slice. Pull the ribs out and let them rest for a full 10 minutes before cutting. Resting lets the juices settle back into the meat and gives the glaze a minute to set into a sticky coat instead of a runny one. Slice down between the bones with a sharp knife, one rib at a time. They will be so tender that the knife mostly just separates them. Serve right away, with extra BBQ sauce on the side for dipping.
Frequently Asked Questions
How does Texas Roadhouse make ribs so tender?
The tenderness comes from cooking pork ribs low and slow until the tough collagen between the bones melts into soft gelatin. At home you copy that by baking baby back ribs at 275 degrees for about 2.5 to 3 hours, sealed tightly in foil so they steam in their own juices. The foil wrap is the key, because the trapped moisture speeds up the breakdown and keeps the meat from drying out. Then a quick broil sets the sticky BBQ glaze on top.
Are these baby back or spare ribs?
This recipe is written for baby back pork ribs, which come from up near the spine and are shorter, curved, and leaner than spare ribs. They are the closest match to the Texas Roadhouse style. You can absolutely use St. Louis style spare ribs with the same method, but they are meatier and need a bit more time, usually the full 3 hours or slightly longer. Just rely on the tenderness checks rather than the clock if you swap.
Do I really need to remove the membrane?
Yes, do not skip it. The thin silver membrane on the bone side never softens, no matter how long you cook, and it blocks the rub from flavoring the meat. Leaving it on means a chewy film on every bite and less seasoned ribs. It takes about a minute per rack. Slide a knife under one edge, grab it with a paper towel, and peel it off. Cold ribs release it more easily, and many butchers will remove it for you if you ask.
Can I make these ribs without a grill or smoker?
Completely. This whole recipe is designed for a regular oven, no special equipment needed. The low 275 degree bake in foil does all the tenderizing, and the broiler caramelizes the BBQ glaze at the end, giving you that sticky, slightly charred crust. A grill is a nice optional finish for a smokier char, but it is not required at all. The smoked paprika in the rub adds a smokehouse note so the ribs still taste like they came off a pit.
What internal temperature should pork ribs reach?
Pork ribs are safe at 145 degrees, but they will be tough at that point. The tenderness you want for fall off the bone ribs happens much higher, around 195 to 203 degrees, where the collagen has fully turned to gelatin. Rather than chase a number, read the physical signs: the meat pulls back to expose the bone tips, a toothpick slides in with no resistance, and the rack bends and cracks when you lift it with tongs. Those tell you they are done.
Whats the difference between beef and pork ribs here?
A lot. These are pork baby back ribs, which are leaner, smaller, and cook in about 3 hours. Beef ribs are bigger, beefier, and richer, and they shine with smoking or slow-cooker methods over a longer time. For this exact Roadhouse copycat, you want pork. If you are deciding between the two, my beef vs pork ribs guide breaks it down cut by cut, and I keep separate recipes for smoked beef ribs and slow-cooker beef ribs if beef is what you are craving.
Why are my ribs tough instead of tender?
Almost always it is one of two things: not enough time, or too high a temperature. If the collagen has not fully broken down, the meat stays chewy, so the fix is simply more time at 275 in the foil. Crank the heat to rush them and you seize the meat up and dry it out instead. Also make sure your oven is actually running at 275, since many ovens run cool or hot. Reseal and keep cooking, checking the bend and toothpick tests until they pass.