Southern Comfort Food
Texas Toothpicks
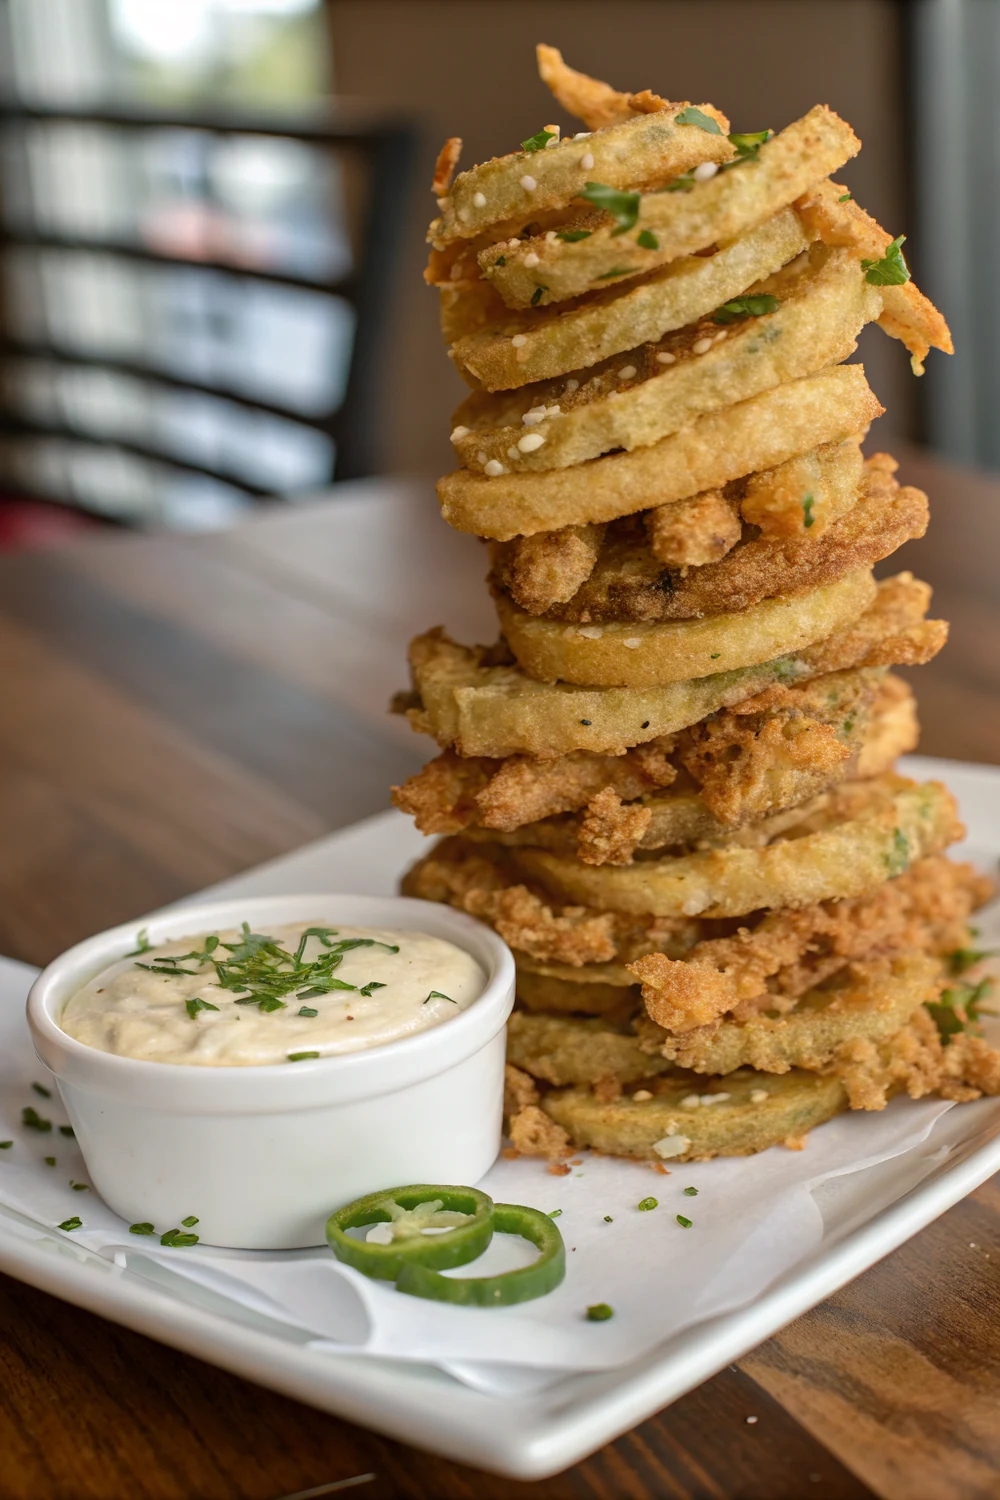
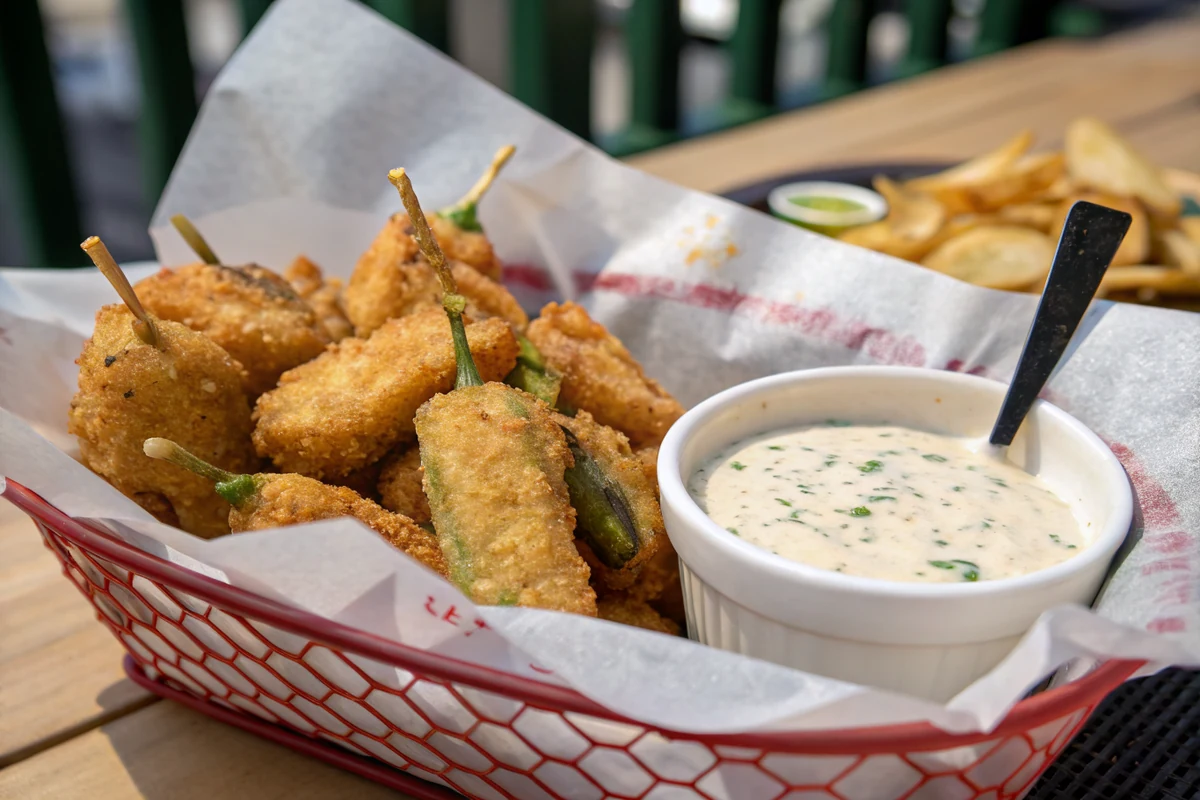
Chef Mia's Texas Toothpicks, the steakhouse appetizer of crispy fried jalapeno and onion strips in seasoned buttermilk batter, with a cajun horseradish dip.
Quick answer: Texas Toothpicks are a Texas steakhouse appetizer of thin matchstick strips of jalapeno and onion, soaked in seasoned buttermilk, dredged in a cajun-spiced flour and cornstarch blend, then deep-fried crispy and served with a creamy cajun horseradish dip. To make them, slice fresh jalapenos and a yellow onion into thin matchsticks, seeding the peppers if you want less heat. Soak them in buttermilk, dredge in the seasoned flour, and fry in small batches in 350F oil for 2 to 3 minutes until golden. Drain on a wire rack and serve right away with the dip. They are crispy, spicy, and dangerously addictive.
The first time I had Texas Toothpicks at a steakhouse, I ordered them again before the first basket was even empty. They are these skinny, crispy fried strips of jalapeno and onion, all tangled together in a craggy seasoned crust, and they hit every note I love: crunchy, spicy, salty, with a cool cajun horseradish dip to drag them through. They look fancy and a little chaotic in the basket, but they are honestly one of the easiest fried snacks I make at home. A couple of fresh jalapenos, an onion, some buttermilk and flour, and a pot of hot oil. That is the whole show.
I have been making these in my Hill Country kitchen for years now, usually when friends drop by and I need something to put in front of them fast. The matchstick cut is what gives them that signature toothpick look and that shattering crunch in every bite. They fry up in minutes, they disappear even faster, and the dip comes together while the oil heats. In this recipe I will walk you through cutting the strips, the buttermilk soak, the seasoned dredge that actually stays crispy, the right oil temperature, and the dip that ties it all together. Let me show you how I do it.
What Texas Toothpicks Actually Are
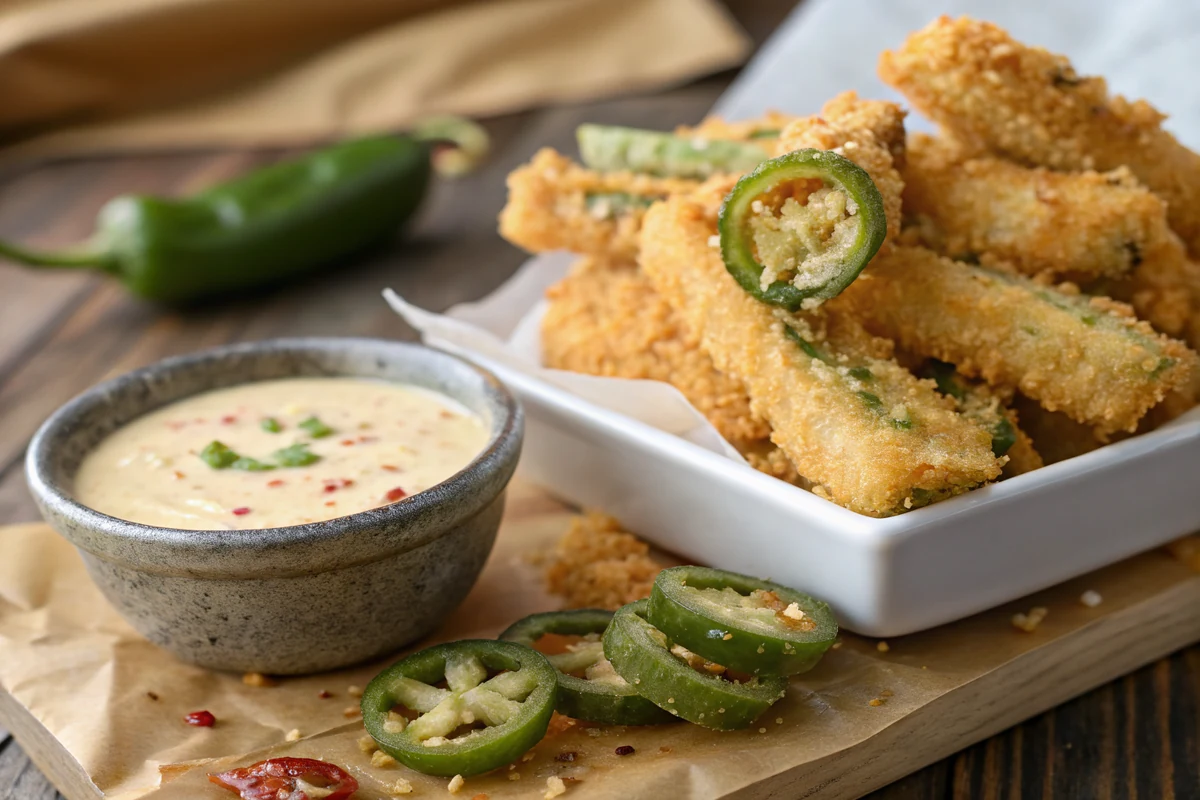
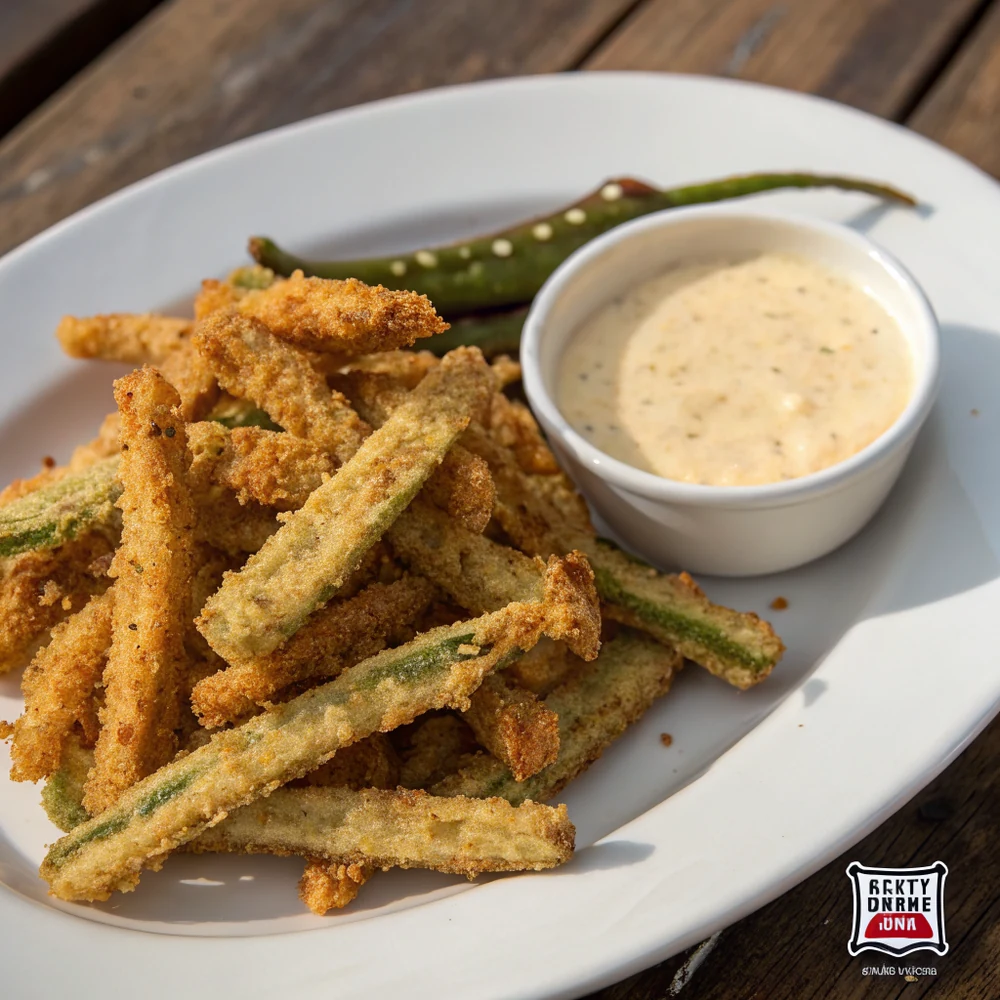
If you have never run into them, Texas Toothpicks are a steakhouse appetizer made of thin matchstick strips of jalapeno and onion, battered in seasoned buttermilk and flour, then deep-fried until crispy and served with a creamy cajun dipping sauce. The name comes from their shape. The strips fry up skinny and craggy and tangled together, looking a bit like a pile of crunchy little toothpicks. They are spicy, salty, crunchy, and almost impossible to stop eating once the basket lands on the table.
I think of them as the wilder cousin of fried jalapenos. Instead of breaded rings or whole stuffed peppers, you get these slim strips where the jalapeno and onion fry together, so every bite has both the heat of the pepper and the sweetness of the onion. That combination is the whole magic. The onion mellows and caramelizes a touch in the hot oil while the jalapeno keeps its bright, grassy bite. Together they make something far more interesting than either one fried on its own.
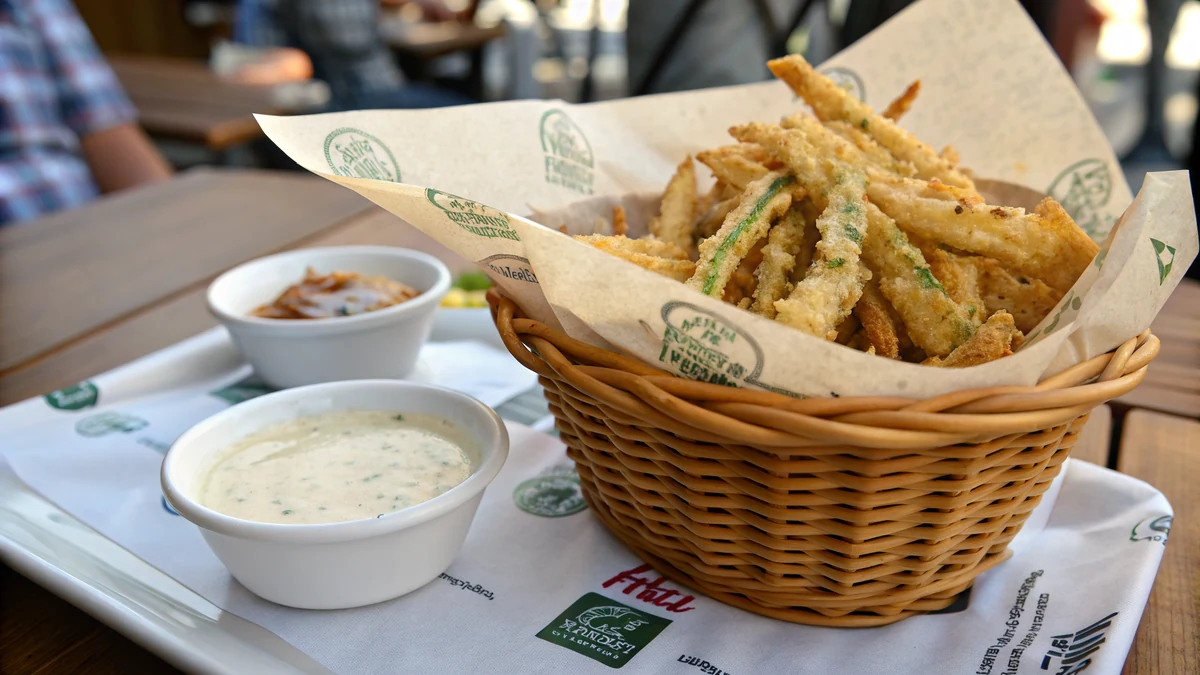
They show up on a lot of Texas steakhouse menus as a starter, usually in a paper-lined basket with a dip on the side. They belong to the same family of crave-worthy fried appetizers as the cactus blossom and crispy fried pickles, the kind of thing you order to share and then quietly hoard. The good news is they are genuinely simple to make at home, and the homemade version is fresher and crispier than most restaurant baskets I have had.
Choosing and Cutting the Jalapenos and Onion
Start with firm, glossy jalapenos that feel heavy for their size. I look for ones without too many white stress lines on the skin, since those tend to run hotter, though that is more of a rough guide than a rule. You want 3 to 4 peppers and one large yellow onion. Yellow onion is my pick because it has the right balance of sweetness and bite and crisps up beautifully. A sweet onion works too if that is what you have on hand.
The matchstick cut is what makes these Texas Toothpicks rather than just fried jalapenos. Halve the peppers lengthwise, then slice them into thin strips about the thickness of a pencil lead. Cut the onion the same way, halving it and slicing into matchsticks of a similar size. Keeping them roughly equal means they cook at the same rate, so nothing burns while something else stays raw. Thin and even is the goal. Thick strips stay too crunchy-raw inside and never get that delicate shatter.
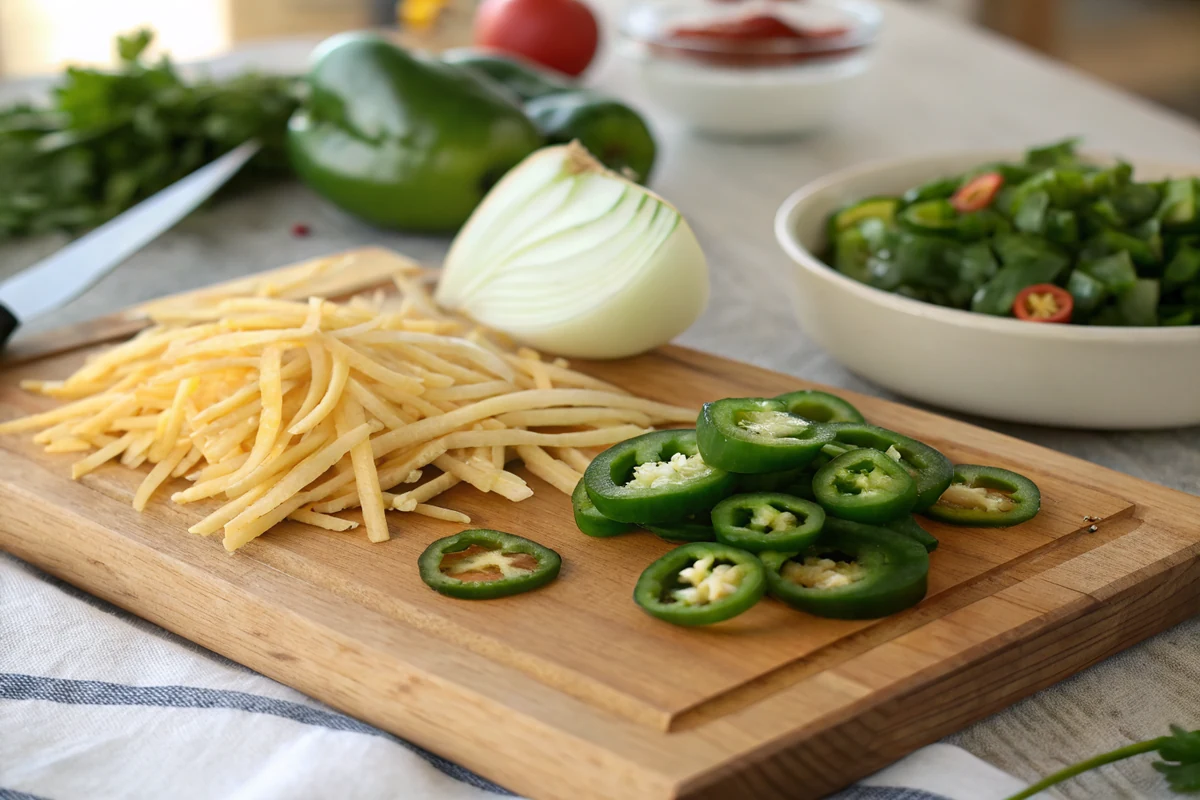
Heat control happens right here at the cutting board. Most of a jalapeno's fire lives in the seeds and the white inner ribs, not the green flesh. If you want milder toothpicks, scrape those out with the edge of a spoon before slicing. Leave them in for a serious kick. I usually seed about half my peppers and leave the rest loaded, which gives the basket a nice range. And please wash your hands well or wear gloves, because that capsaicin oil lingers and will find your eyes hours later.
The Buttermilk Soak
The buttermilk soak is a quiet step that does a lot of heavy lifting. I pour two cups of buttermilk over the cut strips and toss them so every piece is coated, then let them sit for at least 15 minutes. That window is usually exactly how long it takes me to heat the oil and stir together the dip, so nothing is wasted. The strips soak while I prep, and they come out tasting better for it.
First, the buttermilk tames the sharp raw edge of the onion and softens the jalapeno just slightly, so the finished toothpicks taste rounded instead of harsh. Its gentle acidity mellows everything without cooking it. Second, and just as important, the buttermilk gives the seasoned flour something to grab onto. Wet, tangy strips pull the dredge into a thick, bumpy coat, and those bumps are what fry up into the craggy, extra-crunchy crust that makes these so good.
You can stretch the soak longer if you want to prep ahead. An hour or even a couple of hours in the fridge is fine and will only mellow the onion further. If you do not keep buttermilk around, you can make a quick stand-in by stirring a tablespoon of lemon juice or white vinegar into a cup of regular milk and letting it sit for five minutes until it thickens slightly. It is not identical, but it does the job in a pinch for this recipe.
The Seasoned Dredge That Stays Crispy
A lot of fried jalapeno recipes end up heavy and bready, and the fix lives in the dredge. Mine is two cups of all-purpose flour cut with a half cup of cornstarch. The cornstarch is the trick. It has no gluten to toughen up, so it fries into a light, glassy crust that shatters when you bite it instead of going dense and doughy. Once I started adding cornstarch to my fried foods, I never went back. It is the difference between crispy and just coated.
The seasoning is where the flavor gets built, so I am generous with it. A tablespoon of cajun seasoning brings that warm, smoky, slightly spicy backbone that defines these toothpicks. Garlic powder adds savory depth, and salt and black pepper season the whole crust. Whisk it all into the flour and cornstarch until the color is even. Taste a pinch of the dry mix, since that is the truest preview of how the finished crust will taste, and adjust if you want more cajun punch or salt.
Dredge in batches and only coat what you are about to fry next. Lift a handful of strips out of the buttermilk, let the excess drip away, drop them into the flour, and toss and press so each strip is covered, separating any that clump. Then shake off the loose flour. If floured strips sit around too long before frying, the coating turns gummy and pasty and will not crisp properly. Coat, fry, repeat. Keeping that rhythm is what gives you a clean, crackly crust every batch.
Oil Temperature and Frying in Batches
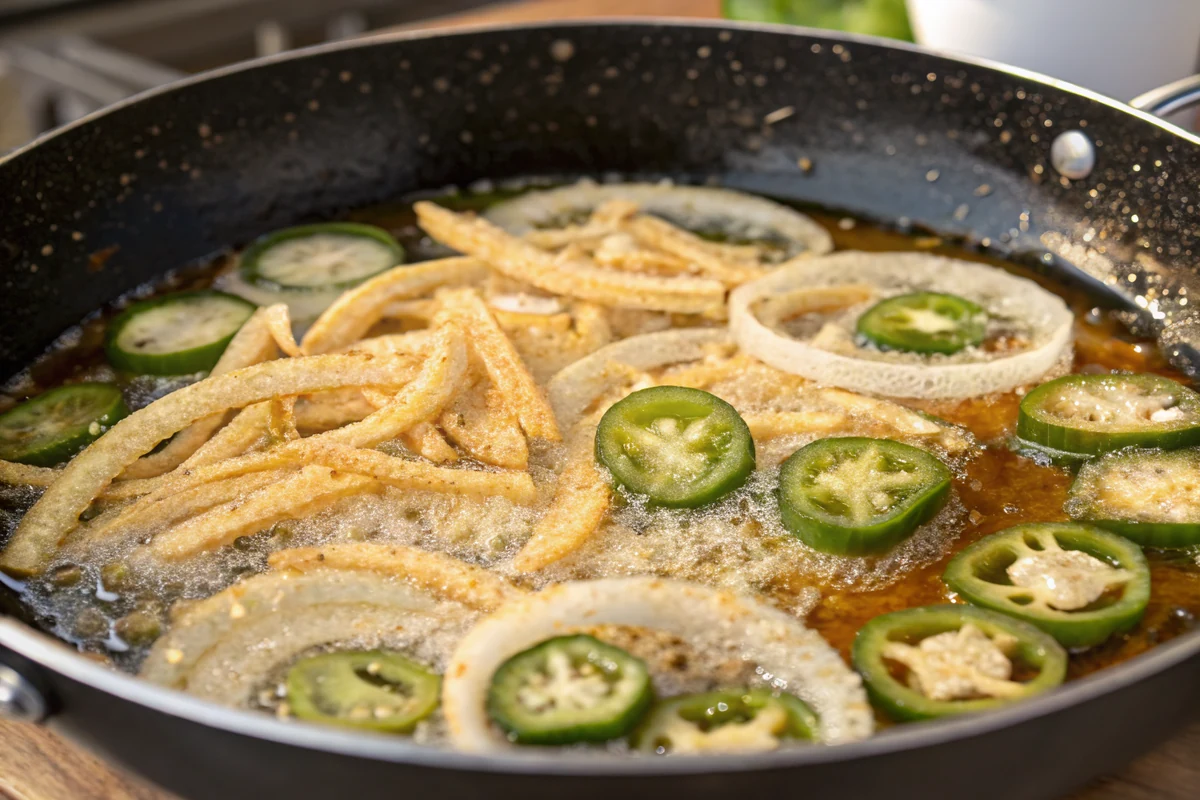
If there is one thing that makes or breaks these toothpicks, it is oil temperature. I heat about 2 to 3 inches of oil in a heavy pot to a steady 350F and clip a thermometer to the side so I can actually see it, not guess. At 350F the strips fry fast, the crust sets and browns, and very little oil soaks in. Drop too low, say down toward 300F, and the coating turns greasy and limp. Push too high and the crust scorches before the insides are done.
Fry in small batches, and resist the urge to crowd the pot. Every handful of cold, wet strips you add drops the oil temperature, so if you dump in too much at once the temperature crashes and you get pale, oily, sad toothpicks instead of golden crispy ones. I add a loose handful at a time, gently shaking them apart as they go in so they do not weld into one fried clump. Then I let the oil climb back to 350F before the next batch goes in.
Each batch only needs about 2 to 3 minutes. The strips are thin, so they cook quickly, going from raw to deep golden in the time it takes to stir them once or twice. Watch the color rather than the clock, since your stove and pot will run a little differently than mine. When they are an even, rich golden brown and the bubbling around them has slowed down, they are done. Pull them right away, because the carryover heat will keep cooking them for a moment on the rack.
The Cajun Horseradish Dip
The dip is not an afterthought here, it is half the reason these are so addictive. The cool, creamy, sharp sauce is the perfect foil for the hot, crispy, spicy strips. I build mine on a base of mayonnaise and sour cream, which gives it body and a gentle tang, then I wake it up with prepared horseradish for that nose-tingling sharpness that cuts right through the fried richness. It comes together in the time it takes the oil to heat.
From there I stir in a teaspoon of cajun seasoning to echo the spice in the crust, a squeeze of fresh lemon juice for brightness, and a dash of hot sauce for a little extra kick. Whisk it all smooth, then taste and adjust. Want it sharper? More horseradish. Want more heat? More hot sauce. Want it tangier? A touch more lemon. This dip is very forgiving, so make it yours. I like mine with a real horseradish bite, but I dial it back when I am feeding a crowd with mixed tolerances.
If you want options on the table, this dip plays beautifully next to a cool ranch. A lot of folks love dragging fried things through ranch, and my ranch dressing recipe is a great mellow contrast to the spicy cajun horseradish. Put out both and let people choose, or alternate dips bite to bite the way I do. The dip also keeps well, so I often make a double batch and stash half in the fridge for the next snack attack.
Keeping Them Crispy and Not Soggy
Crispiness is fragile, and a few small habits protect it. The first is the wire rack. As soon as the toothpicks come out of the oil, I set them on a rack over a sheet pan, never on a plate lined with paper towels. Paper traps steam against the bottom of the strips, and within a couple of minutes that steam softens the crust you worked so hard to build. A rack lets air move all the way around each strip so they stay crunchy from top to bottom.
Salting at the right moment matters too. I sprinkle a little salt over the toothpicks the second they hit the rack, while they are still glistening and hot, because that is when the salt clings best and seasons the surface. Wait until they cool and the salt just slides off. This is also the moment to add any extra cajun seasoning if you want a bolder hit, dusting it on while the strips are hot and slightly oily so it sticks.
Most of all, timing is everything with fried food. These toothpicks are at their absolute peak within a few minutes of leaving the oil, so I plan to fry them right before serving and I bring people to the kitchen rather than letting the basket sit. If you must hold a batch while you fry the rest, keep the drained strips on the rack in a low 200F oven. That keeps them warm and crisp without overcooking, but honestly, fresh and immediate always wins.
Serving Ideas and Pairings
I serve Texas Toothpicks the way the steakhouses do, piled high in a paper-lined basket with the cajun horseradish dip tucked right alongside. They are built for sharing, so they shine as a passed appetizer at a party or a game-day spread where everyone can grab a handful. A little flaky salt over the top and maybe a wedge of lemon on the side, and the basket is ready. Simple, generous, and gone in minutes, every single time.
They also love company on a bigger fried platter. I will set them out next to crispy fried pickles and a wedge of fried onion so guests can mix and match crunchy, spicy, and tangy bites. If you want to lean into that whole steakhouse-starter vibe, a batch of fried pickles alongside makes an unbeatable duo. The dill pickle tang and the jalapeno heat play off each other, and one shared dip can cover both if you are keeping it casual.
As a side or topper, these are sneaky good too. I have scattered them over burgers and pulled pork sandwiches for a spicy crunch, piled them on top of loaded nachos, and used them to garnish a bowl of chili. They bring heat, salt, and texture all at once. For drinks, they go with ice-cold beer, a margarita, or a tart lemonade. Anything cool and a little acidic balances the heat and the fried richness and keeps you reaching for more.
My Hill Country Kitchen Notes
Out here in the Hill Country, jalapenos are practically a pantry staple, and these toothpicks are how I use up the ones that pile up on the counter in late summer. A few things I have learned over many batches. First, peanut oil is my favorite for frying these because it has a high smoke point and a clean, neutral flavor, but plain vegetable or canola oil works fine. Whatever you use, make sure it is fresh, because tired old oil makes everything taste off no matter how careful you are.
Second, I taste-check my jalapenos before I commit. Heat varies wildly from pepper to pepper, even off the same plant, so I will nibble a tiny sliver of the raw flesh to gauge how fiery the batch is, then decide how aggressively to seed. A mild batch I might leave fully loaded. A scorcher I will seed completely. This little habit has saved me from accidentally serving a basket that blows everyone's head off, which, I will admit, has happened.
Third, I almost always make extra dredge and extra dip. The seasoned flour keeps in a sealed jar for weeks and is great on other fried things, and the cajun horseradish dip is wonderful on sandwiches and roasted potatoes. And one last thing: fry with the windows open and the fan on. Frying jalapenos sends a peppery mist into the air that will make everyone in the house cough and sneeze a little. It is worth it, but you have been warned. A well-ventilated kitchen makes the whole thing much more pleasant.
Mistakes to Avoid
The biggest mistake I see is cool oil. People get impatient, the oil never quite reaches 350F, and the toothpicks come out greasy and pale instead of crisp and golden. Use a thermometer and let the oil fully come up to temperature, then let it recover between batches. The second big one is crowding the pot. Too many strips at once crashes the temperature and steams the coating instead of frying it. Small batches every time, even though it takes a little longer.
Cutting the strips too thick is another common slip. Thick matchsticks stay raw and rubbery in the center and never get that delicate shatter, plus they throw off the cooking time. Keep them pencil-lead thin and roughly even. On the flip side, do not let the floured strips sit too long before frying, or the coating turns gummy and pasty. Dredge only the batch you are about to drop in the oil, and keep that coat-fry-repeat rhythm going.
Finally, do not drain them on paper towels and do not let them sit around before serving. Both turn a crispy triumph into a soggy disappointment. Use a wire rack, salt them hot, and serve them within minutes of frying. And handle those jalapenos with respect. Wash your hands well or wear gloves, because the one time you rub your eye after seeding a dozen peppers, you will never forget it. Avoid these few traps and your Texas Toothpicks will come out perfect every time.
Texas Toothpicks Recipe
Ingredients
- For the toothpicks:
- 3 to 4 fresh jalapenos
- 1 large yellow onion
- 2 cups buttermilk
- 2 cups all-purpose flour
- 1/2 cup cornstarch
- 1 tablespoon cajun seasoning
- 1 teaspoon garlic powder
- 1 teaspoon salt
- 1/2 teaspoon black pepper
- Vegetable or peanut oil, for frying
- For the cajun horseradish dip:
- 1/2 cup mayonnaise
- 1/4 cup sour cream
- 2 tablespoons prepared horseradish
- 1 teaspoon cajun seasoning
- 1 tablespoon fresh lemon juice
- 1/2 teaspoon hot sauce, or more to taste
Instructions
- Cut the jalapenos and onion into matchsticks. Slice the tops off the jalapenos and cut them in half lengthwise. For milder toothpicks, scrape out the seeds and white ribs with a spoon, since that is where most of the heat lives. Leave them in if you like things fiery. Slice each pepper into thin matchstick strips about the thickness of a pencil lead. Peel the onion, halve it, and slice it into matchsticks of the same size so everything fries evenly. I always wear gloves or wash my hands well after, because jalapeno oil on your fingers near your eyes is no fun.
- Soak the strips in buttermilk. Pile the jalapeno and onion strips into a bowl and pour the buttermilk over them, tossing so every strip is coated. Let them soak for at least 15 minutes while you heat the oil and make the dip. The buttermilk does two jobs: it mellows the raw onion bite and gives the dredge something to cling to, so the seasoned flour grabs on in a thick, craggy coat. You can soak them up to a couple of hours in the fridge if you want to prep ahead.
- Mix the seasoned dredge. In a wide, shallow bowl, whisk together the flour, cornstarch, cajun seasoning, garlic powder, salt, and black pepper until evenly blended. The cornstarch is my secret here, because it keeps the crust light and crisp instead of heavy and bready. Taste a pinch of the dry mix and adjust the salt or cajun seasoning if you want it bolder. This dredge is where most of the flavor lives, so do not be shy with the seasoning.
- Heat the oil to 350F. Pour about 2 to 3 inches of vegetable or peanut oil into a heavy pot or Dutch oven and clip on a thermometer. Heat it to 350F over medium heat. This temperature matters more than almost anything else. Too cool and the strips drink up oil and turn greasy, too hot and the crust burns before the inside cooks. While it heats, set a wire rack over a sheet pan near the stove so you have a landing spot for the fried toothpicks. Never walk away from hot oil.
- Dredge the strips in batches. Working with a handful of strips at a time, lift them out of the buttermilk, let the excess drip off, and drop them into the seasoned flour. Toss and press the flour onto the strips, separating any that clump together so each one gets coated. Shake off the loose flour in a strainer or your hands. Dredge only the batch you are about to fry, since the coating gets gummy if the floured strips sit too long before they hit the oil.
- Fry in small batches. Lower a small handful of dredged strips into the 350F oil, gently shaking them apart so they do not clump into one fried lump. Fry for 2 to 3 minutes, stirring once, until they are deep golden and crisp. Fry small batches, because dumping in too much at once drops the oil temperature and gives you soggy, pale toothpicks. Let the oil come back up to 350F between batches. The strips cook fast, so stay right there and watch the color.
- Drain on a wire rack. Lift the fried toothpicks out with a spider or slotted spoon and set them on the wire rack to drain. I always use a rack, not paper towels, because paper traps steam underneath and turns the bottoms soggy within minutes. A rack lets air circulate all the way around so they stay crunchy. Sprinkle them with a little salt while they are still hot, when the seasoning sticks best. Repeat with the remaining batches.
- Make the dip and serve. While the oil heats or between batches, stir together the mayonnaise, sour cream, horseradish, cajun seasoning, lemon juice, and hot sauce in a small bowl. Taste and adjust, adding more horseradish for sharpness or hot sauce for heat. Pile the fried toothpicks into a basket or onto a plate and serve them immediately with the dip alongside. These are at their absolute best within a few minutes of leaving the oil, so call everyone to the table before you fry the last batch.
Frequently Asked Questions
Are Texas Toothpicks spicy, and how do I reduce the heat?
They have a real jalapeno kick, but the heat is easy to control. Most of a jalapeno's fire lives in the seeds and the white inner ribs, so scraping those out before you slice the peppers gives you much milder toothpicks. Leave the seeds in for a serious burn. The buttermilk soak and the creamy cajun dip also take the edge off, so even a spicier batch stays very snackable. I often seed half my peppers and leave the rest loaded for a range of heat.
Can I bake or air-fry these instead of deep-frying?
You can, though the texture will be a little different. For the air fryer, dredge the strips, mist them well with oil, and cook at 400F for about 8 to 10 minutes, shaking the basket halfway through, until golden and crisp. For the oven, spread them on a wire rack set over a sheet pan, spray with oil, and bake at 425F for 15 to 20 minutes. Neither gets quite as shatteringly crisp as deep-frying, but both are lighter and still tasty.
What oil is best for frying Texas Toothpicks?
I reach for peanut oil first because it has a high smoke point and a clean, neutral flavor that lets the jalapeno and seasoning shine. Vegetable, canola, or any neutral oil with a high smoke point works well too. Avoid olive oil or butter, which burn at frying temperatures. Whatever you choose, make sure it is fresh, since old or overused oil gives fried food an off, stale taste no matter how good your batter is.
How do I keep Texas Toothpicks crispy?
Three things keep them crispy. First, fry at a steady 350F in small batches so the crust sets fast without soaking up oil. Second, drain them on a wire rack instead of paper towels, since paper traps steam and softens the bottoms. Third, serve them within a few minutes of frying, when they are at their peak. If you must hold them, keep them on the rack in a low 200F oven so air circulates and they stay crunchy.
What dipping sauce goes best with Texas Toothpicks?
The classic pairing is a creamy cajun horseradish dip, made from mayonnaise, sour cream, prepared horseradish, cajun seasoning, lemon, and a dash of hot sauce. The cool, sharp creaminess is the perfect contrast to the hot, crispy strips. Ranch dressing is another favorite for a milder option, and a chipotle or comeback-style sauce works beautifully too. I like to put out two dips so guests can choose between the sharp horseradish and something mellower.
Can I make Texas Toothpicks ahead of time?
You can do the prep ahead, but they are really best fried fresh. Cut the jalapenos and onion and keep them in the buttermilk in the fridge for up to a couple of hours, and make the dip up to two days in advance. The frying itself, though, should happen right before serving, because the crust softens as the toothpicks sit. If you have leftovers, reheat them in a 400F air fryer or hot oven for a few minutes to bring back some crisp.
What is the difference between Texas Toothpicks and jalapeno poppers?
They are pretty different snacks. Jalapeno poppers are whole or halved peppers stuffed with cheese, then breaded or wrapped in bacon and baked or fried, so each one is a soft, cheesy, hand-held bite. Texas Toothpicks are thin matchstick strips of jalapeno and onion fried together in a seasoned crust, so they are crunchy, light, and meant to be eaten by the handful. Poppers are about creamy cheese, toothpicks are all about that crispy, spicy crunch.