Texas BBQ
Texas T-Bone Steak
Chef Mia's Texas T-bone steak done right in a cast-iron skillet. The butter baste, the thermometer trick, and how to slice both muscles off the bone.
Quick answer: To cook a Texas T-bone at home, pull two 1.25 to 1.5 inch steaks from the fridge an hour early, pat them bone-dry, and season hard with kosher salt, pepper, and garlic powder. Get a cast-iron skillet screaming hot, add a film of neutral oil, and sear the strip side first, then the bone side, building a deep brown crust. Tilt the pan, add butter, smashed garlic, and thyme, and spoon that foaming butter over the meat a minute or two. Use a thermometer and pull at 130 to 135F for medium-rare, angling the leaner tenderloin away from the hottest spot since it cooks faster. Rest 10 minutes, then slice both muscles off the bone against the grain.
A T-bone is the steak I cook when I want to feel like I am out at a proper Texas steakhouse without leaving my own kitchen. It is really two steaks in one, a strip on the big side of the bone and a little tenderloin on the small side, and that T-shaped bone running down the middle holds them both. The first few times I cooked one I treated it like a regular steak and the tenderloin always came out overdone while the strip was still perfect. Once I learned to respect that the two sides cook at different speeds, my T-bones got a whole lot better, and now this is one of my most-requested suppers.
I cook mine in cast iron most nights, because that heavy black skillet gives me the kind of dark, crusty sear that makes a steak taste like the real deal. You do not need a grill, a smoker, or any fancy gear. You need a good thick steak, salt, pepper, a hot pan, and a little butter at the end. I will walk you through the whole thing the way I do it at home in the Hill Country, including the thermometer trick that takes all the guesswork out and the way I slice the meat off the bone so every bite is tender. By the end you will cook a steakhouse-worthy T-bone in about half an hour.
What a T-Bone Actually Is
A T-bone is named for the T-shaped bone that runs down the center of the steak, and that bone is doing more than looking pretty. It separates two completely different muscles. On the wide side you get the strip, also called the New York strip, which is firm, beefy, and well marbled. On the narrow side you get a piece of the tenderloin, the same muscle that filet mignon comes from, which is buttery soft and milder. One steak, two textures, divided by a bone. That is the whole appeal, and it is also the whole challenge.
Because those two muscles are so different, they do not cook at the same rate. The lean tenderloin heats up faster and overcooks easily, while the bigger, fattier strip takes longer to come to temperature. If you cook a T-bone flat and even like you would a single-muscle steak, the tenderloin ends up dry and gray by the time the strip is right. Half of cooking a great T-bone is just managing that difference, which I will get into when we talk about heat and the thermometer.
The bone itself is not just a divider either. It insulates the meat right next to it, which means the spots hugging the bone cook a touch slower than the open edges. Some folks swear bone-in steaks taste beefier, and whether that is the bone or just the slower, gentler cooking near it, I am not going to argue. What I will say is that a thick, bone-in T-bone gives you more margin for a beautiful medium-rare center than a thin, boneless steak ever will.
T-Bone vs Porterhouse vs Ribeye
People mix up the T-bone and the porterhouse all the time, and the difference is simple. They are the same cut from the same part of the short loin, but a porterhouse is cut from farther back where the tenderloin muscle is bigger. By the official rule, the tenderloin on a porterhouse has to be at least 1.25 inches wide at its widest point, while a T-bone has a smaller tenderloin. So a porterhouse is basically a big T-bone with a generous filet side. Cook them exactly the same way.
The ribeye is a different animal in terms of texture. It comes from the rib section, it is heavily marbled with fat, and it is one boneless muscle, so it cooks evenly and tastes rich and beefy throughout. A T-bone gives you variety in one steak, the firm strip and the tender filet, while a ribeye gives you one consistently fatty, flavorful experience. Neither is better, they are just different moods. If a marbled, no-bone steak is what you are after, my cowboy cut ribeye walks through that thick bone-in rib steak start to finish.
So which do I reach for? If I want the best of both worlds in a single steak, and a little drama on the plate, it is a T-bone or a porterhouse. If I am feeding people who want pure, fatty, beefy richness with no thinking required, I go ribeye. The cooking method in this recipe works for all three, because they are all thick steaks that love a hot cast-iron sear and a butter baste. The only thing that really changes is how I manage the leaner tenderloin on the T-bone and porterhouse.
Choosing the Steak
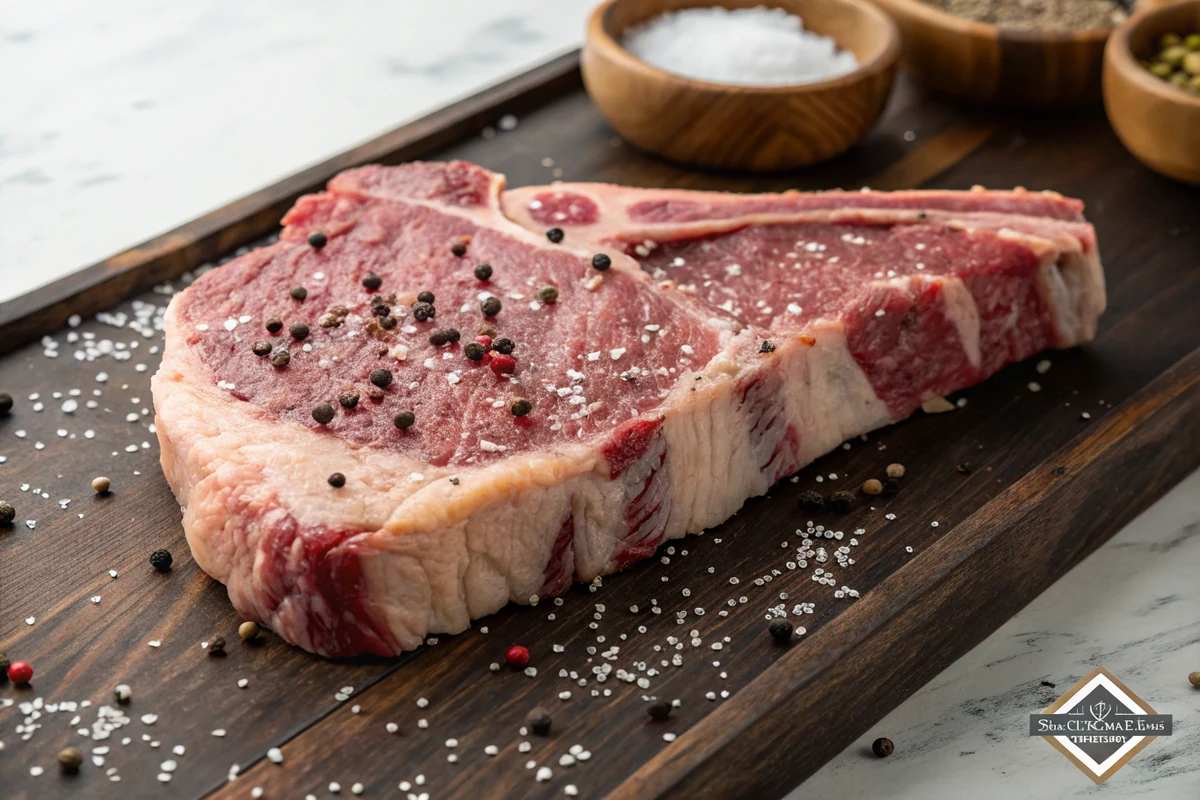
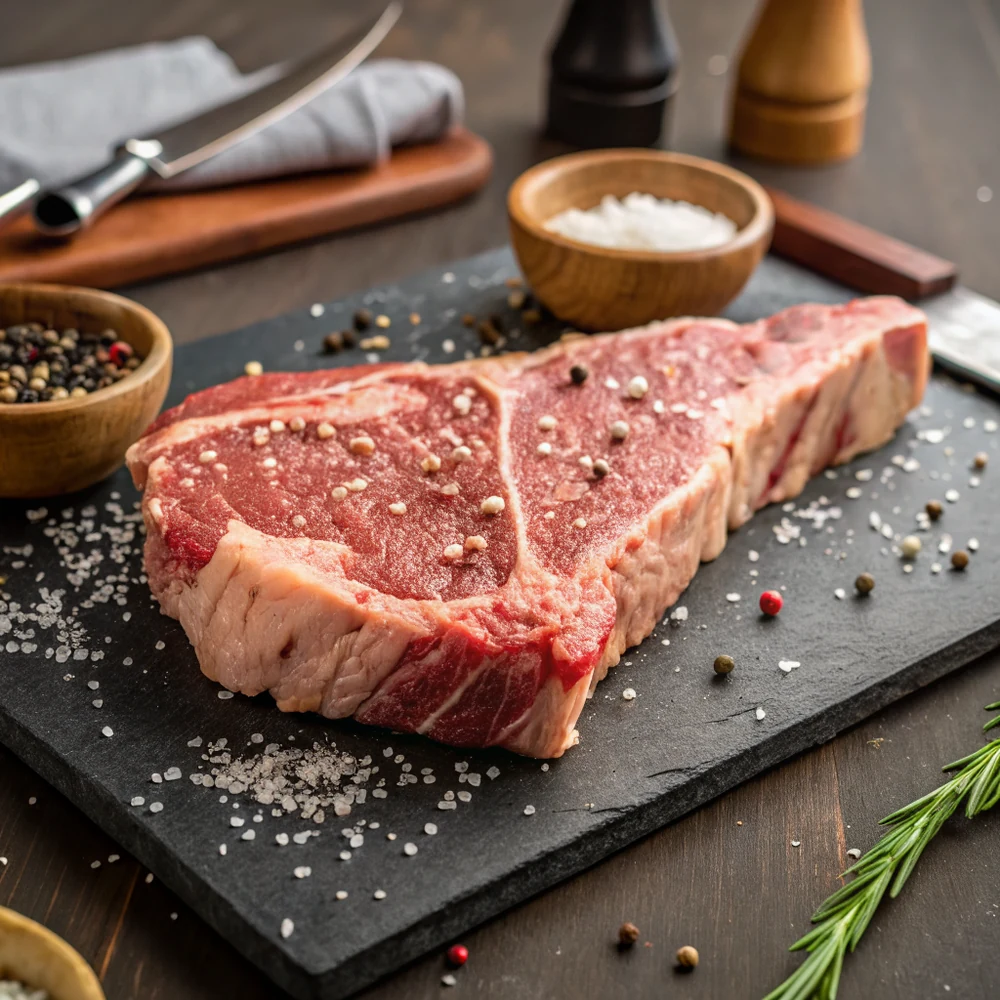
Thickness is the single most important thing when you buy a T-bone, and most grocery-store steaks are cut too thin. I want mine 1.25 to 1.5 inches thick, no thinner. A thick steak lets you build a hard, dark crust on the outside while the inside stays a perfect medium-rare. A thin steak cooks through before the crust ever develops, so you end up choosing between a pale steak or a gray, overcooked one. If the case only has thin ones, ask the butcher to cut you a couple thick. They almost always will.
Look at where the bone sits and how big the tenderloin is. A steak with a generous tenderloin side gives you more of that buttery filet, edging it toward porterhouse territory, which I love. Check that the bone runs cleanly down the middle and the meat is firmly attached on both sides. Then look at the marbling, those thin white threads of fat running through the strip. More marbling means more flavor and juiciness, since that fat melts and bastes the meat from the inside as it cooks.
Grade matters too. USDA Prime has the most marbling and is what good steakhouses serve, but it costs more and can be hard to find. USDA Choice is the sweet spot for home cooks, widely available and plenty good, especially the higher-marbled cuts. Select is leaner and can cook up tougher, so I skip it for a steak this special. Whatever grade you buy, pick the steak with the most even, fine marbling in the strip, and make sure it is a uniform thickness so it cooks evenly across the pan.
One last thing. Buy your steaks a day ahead if you can. I like to season them and let them sit uncovered on a rack in the fridge overnight, which dries the surface beautifully for a better crust. At minimum, get them out of the fridge in time to temper. A great T-bone starts at the meat counter, not the stove, so spend the extra dollar or two on a thick, well-marbled steak and the cooking part gets a whole lot easier.
The Dry Brine and Texas Seasoning
Texas steak seasoning is gloriously simple, and I keep mine that way. Coarse kosher salt, plenty of coarse-ground black pepper, and a little garlic powder. That is the classic salt-and-pepper steakhouse approach, and on a good piece of beef it is all you need. The point of seasoning a T-bone is not to cover up the meat, it is to bring out the beef and build a savory, peppery crust. I press the seasoning in hard so it grips the surface and does not just fall off in the pan.
The trick that makes the biggest difference is dry brining, which just means salting the steak ahead of time. When you salt early, the salt pulls moisture to the surface, dissolves into a brine, and then gets reabsorbed back into the meat, seasoning it deeper than a last-second sprinkle ever could. It also dries the surface, and a dry surface is what gives you that hard, dark crust. Even 40 minutes helps, but overnight on a rack in the fridge, uncovered, is the gold standard.
If you want a little more going on, a Texas-style steak rub adds garlic, onion, and a touch of paprika to the salt and pepper without burying the beef flavor. I keep a jar of my Texas Roadhouse steak seasoning recipe on hand for exactly this, and a teaspoon per side gives the crust a steakhouse character. Just go easy, because the goal is still to taste the steak first. Whatever blend you use, salt is the non-negotiable part, and applying it early is what separates a good crust from a great one.
One caution on salting timing. You either salt right before cooking or a good 40 minutes or more ahead. The window in between, roughly 5 to 30 minutes, is the worst, because that is when the salt has pulled moisture to the surface but it has not been reabsorbed yet, leaving you with a wet steak that steams instead of sears. So salt at the last second, or salt well ahead and let it ride. Pat the surface dry right before it goes in the pan either way.
Cast Iron vs Grill vs Reverse Sear
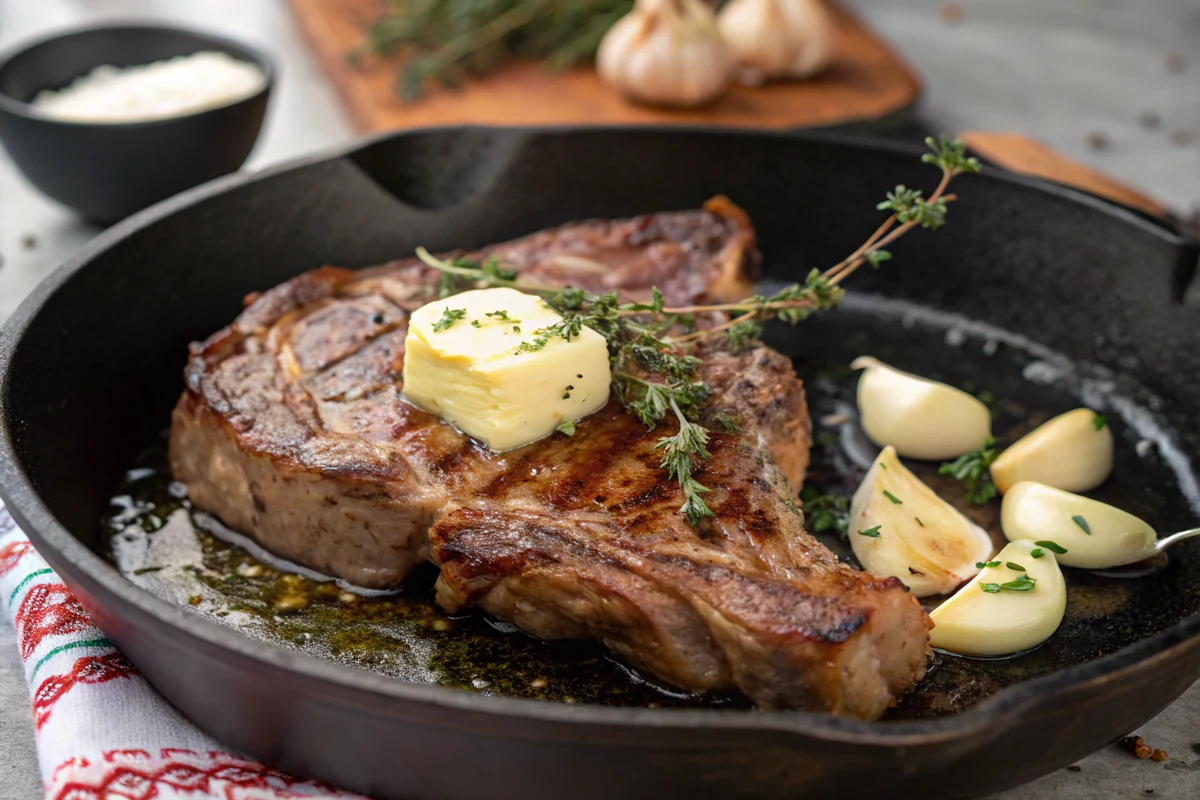
Cast iron is my default for a T-bone, and for good reason. A heavy cast-iron skillet holds a tremendous amount of heat, so when the cold steak hits it the pan does not lose temperature and stall. That steady, intense heat is what drives the browning reaction that builds a deep, crusty sear. It also lets you do the butter baste right there in the same pan, spooning that foaming garlic-thyme butter over the meat. For a steakhouse crust in a home kitchen, nothing beats it.
A grill is the other great option, and it brings something cast iron cannot, that smoky char from the flames. If I am already running the grill for a cookout, I will absolutely throw T-bones on it. Get the grates screaming hot, sear over direct heat to build the crust, then if the steaks are thick you can slide them to a cooler zone to finish without burning. The downside is you lose the easy butter baste, though you can finish with a pat of compound butter on top instead.
The reverse sear is my move for extra-thick steaks, anything pushing 1.75 inches or more. You cook the steak slowly in a low oven, around 250F, until it is about 110 to 115F inside, then sear it hard in a ripping-hot pan at the very end. This gives you an edge-to-edge even pink interior with almost no gray band, plus a great crust, because the surface is already dry from the oven. It takes longer, but for a thick T-bone where you really want precision, it is worth it.
For the standard 1.25 to 1.5 inch T-bone in this recipe, a straight hot-pan sear in cast iron is simplest and gives wonderful results, so that is what I have written the steps around. Pick your method based on your steak and your evening. Thick and you want precision, reverse sear. Cookout going and you want smoke, grill. Quick steakhouse supper any night of the week, cast iron. They all end with a thermometer check and a proper rest, which matter more than the method.
The Butter Baste
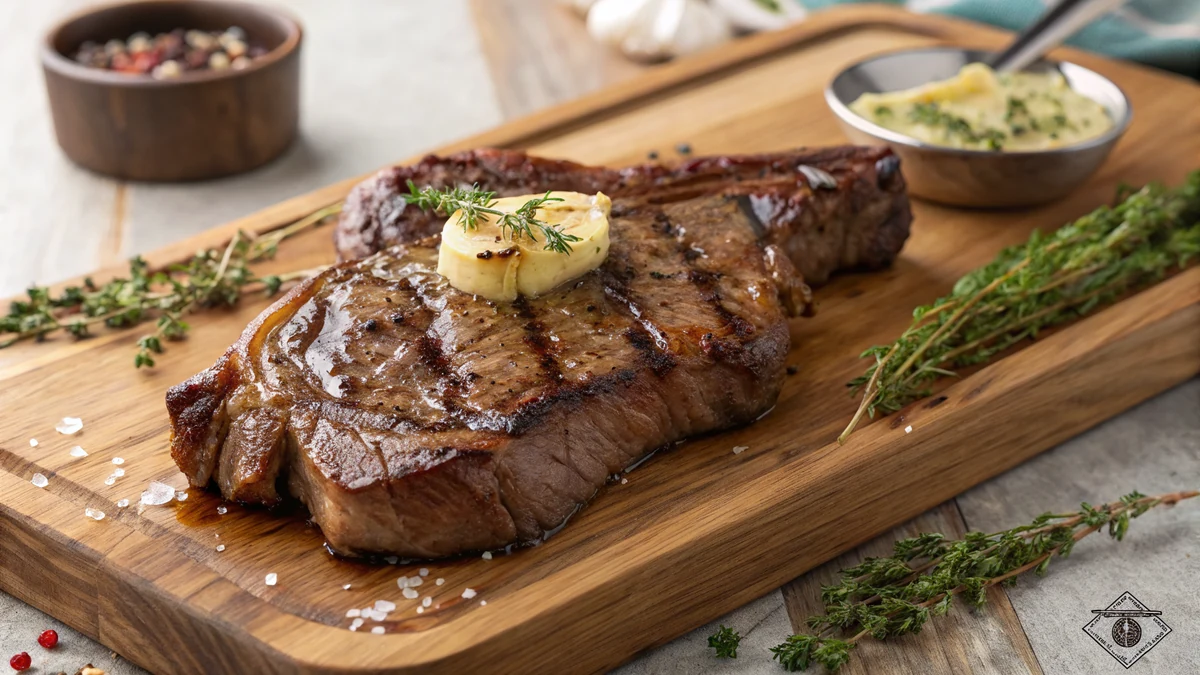
The butter baste is the move that takes a home T-bone into steakhouse territory, and it happens in the last minute or two of cooking. After both sides are seared and crusty, I drop the heat to medium, then add a few tablespoons of unsalted butter, a few smashed garlic cloves, and several sprigs of thyme or rosemary right into the pan. The butter melts and foams, the garlic and herbs sizzle, and the whole kitchen smells like the best steakhouse you have ever been to. That aroma alone is worth it.
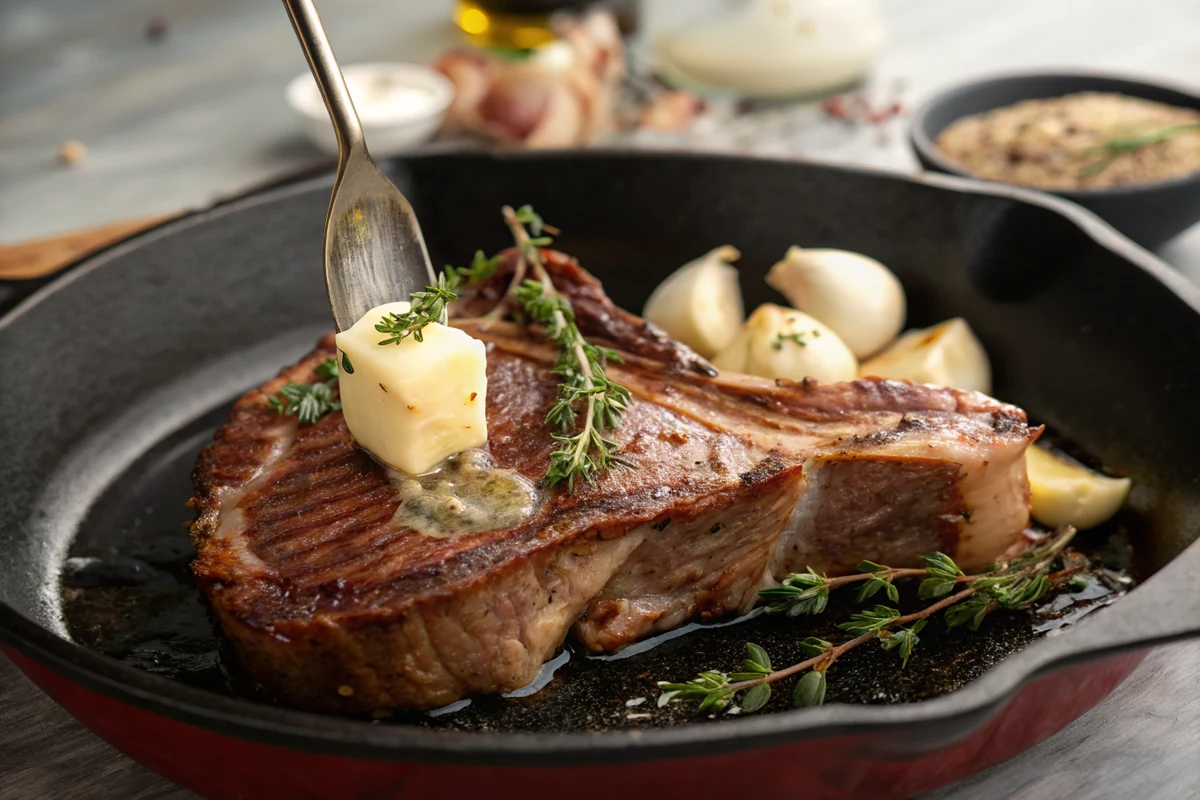
The technique is to tilt the skillet so the melted butter pools at the lower edge, then use a big spoon to scoop that foaming butter up and pour it over the top of the steak, over and over. This does two things. It bastes the surface with garlic and herb flavor, and the hot butter gently cooks the top of the steak, helping it come to temperature without you having to flip it again and risk overcooking. I aim the butter especially over the leaner tenderloin only briefly, since I do not want to push it past medium-rare.
Use unsalted butter so you control the salt, and do not add the butter too early. Butter burns at high heat, and burnt butter turns bitter, so I always knock the heat down to medium before it goes in. The milk solids should brown gently and smell nutty, not scorch and turn black. If you want to take the flavor further, a spoonful of cowboy butter for steak, that punchy garlic-herb-lemon blend, melted over the rested steak is incredible and tastes like a fancy compound butter with almost no effort.
When you are done basting, do not toss those pan juices. After the steaks come out to rest, that browned butter with the garlic and thyme is liquid gold. I spoon it right over the sliced steak at the end. Some nights I will whisk a splash of beef stock into the pan to loosen all the browned bits into a quick little jus. The point is, everything that happened in that skillet is flavor, so the baste keeps working for you right up until the steak hits the plate.
Reading Doneness With a Thermometer
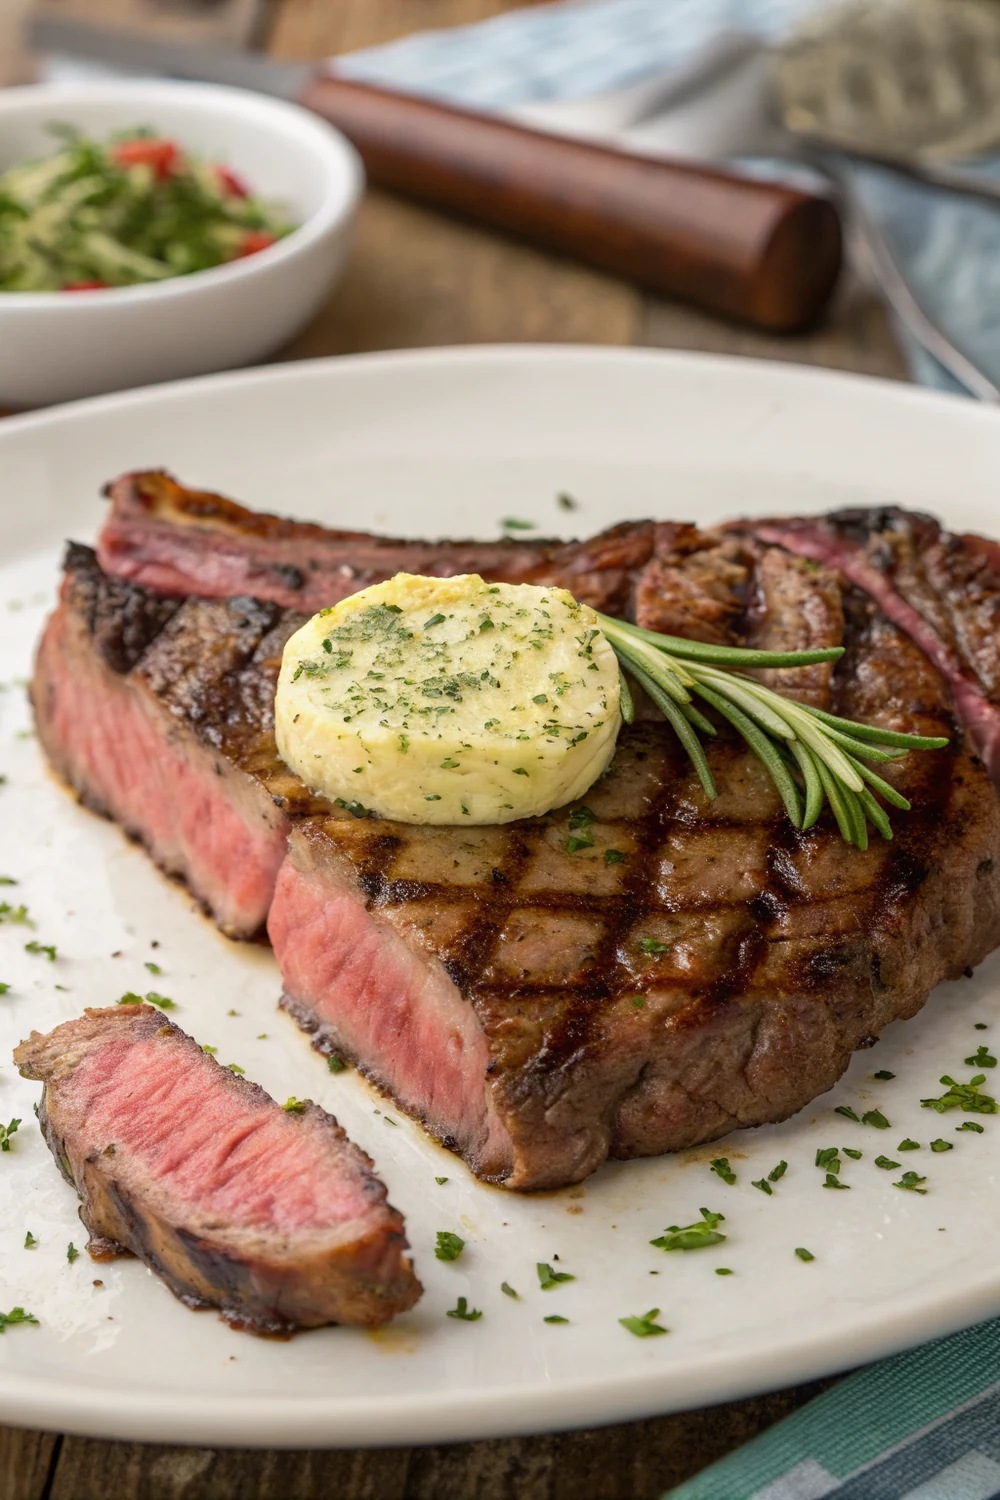
I am going to be blunt: an instant-read thermometer is the single best tool for cooking a T-bone, and the poke test with your finger is not reliable on a steak with two different muscles. The strip and the tenderloin have different densities, so they feel different to the touch even at the same doneness. A thermometer takes all of that guessing away. I pull my T-bones at 130 to 135F for medium-rare, which is where this cut shines, then let carryover heat finish the job during the rest.
Here are my numbers, measured in the thickest part of the strip side. Rare is 120 to 125F, medium-rare is 130 to 135F, medium is 140F, and I do not cook a good T-bone past that. Remember the temperature keeps climbing about 5 degrees after you pull it off the heat, so always pull the steak about 5 degrees below your target. If you want a true medium-rare 135F on the plate, take it out of the pan at 130F. That carryover is real and it will overcook your steak if you ignore it.
Now the two-muscle problem. The lean tenderloin runs hotter and faster than the strip, so I check both sides separately with the thermometer. If the tenderloin hits 130F while the strip is still at 120F, the steak is uneven, and that is exactly why I angle the tenderloin away from the hottest part of the pan and baste it more sparingly. Probe near the bone too, but not touching it, since the bone reads its own temperature. When the strip side hits your target, the steak is ready, and the tenderloin will be a touch more done, which is normal.
Slide the probe in from the side, into the center of the meat, not from the top, so you are reading the true middle. And do not just check once. I probe a couple of times in the last few minutes because thick steaks climb fast at the end. The few dollars a decent instant-read thermometer costs will save you from ruining expensive steaks, and once you cook with one you will never go back to guessing. This is the step that turns a hopeful steak into a perfect one every single time.
Resting and Slicing Off the Bone
Resting is not optional, and skipping it is the most common way people sabotage a perfectly cooked steak. While the steak cooks, the heat drives the juices toward the cooler center. If you cut into it right off the heat, all that juice floods out onto the board and your steak goes dry. Let it rest 10 minutes and the juices redistribute back through the meat, so when you finally slice it, the juice stays in the steak where it belongs. I rest mine uncovered on a board so the crust stays crisp.

Slicing a T-bone is a little ritual that makes every bite better. Instead of trying to saw through the bone, I run my knife right along each side of the bone to free the strip in one piece and the tenderloin in another. Now I have two boneless pieces of steak plus the bone, which, by the way, is the cook's reward to gnaw on in the kitchen. Freeing the muscles like this also lets me slice each one properly, since they run in different directions.
Then I slice each piece against the grain. The grain is the direction the muscle fibers run, and cutting across them, rather than along them, shortens those fibers so each bite is tender instead of stringy and chewy. Look closely and you can see the lines in the meat, then cut perpendicular to them into half-inch slices. The strip and the tenderloin have slightly different grain directions, which is another reason I separate them first. Fan the slices back around the bone on a warm plate and spoon the pan butter over the top to serve.
What to Serve With It
A T-bone is the star, so I keep the sides classic and let the steak shine. The number one partner in my house is a loaded baked potato, fluffy inside with butter, sour cream, chives, and a little cheese. It is the steakhouse standard for a reason, and it soaks up the meat juices and garlic butter beautifully. If you want them exactly like the restaurant, my Texas Roadhouse baked potatoes get that crispy salted skin and fluffy interior just right every time.
I always want something green and a little fresh on the plate to balance all that rich beef and butter. Simple is best. Garlicky sauteed green beans, blistered asparagus, or a crisp wedge salad with blue cheese and bacon all do the job. The acidity and crunch cut through the richness of the steak so the meal does not feel heavy. A pile of buttery mushrooms sauteed in the leftover pan drippings is another favorite, since it uses up all that beefy fond stuck to the skillet.
For a true Texas steakhouse spread, especially when I am feeding a crowd, I will round it out with skillet cornbread, a pot of pinto beans, and some grilled corn. Texas toast, thick slices griddled in butter and garlic, never hurts either. And a big pitcher of sweet tea or an ice-cold beer to wash it all down. The steak does the heavy lifting, so the sides just need to be honest, comforting, and not fight the beef for attention. Keep it simple and let that T-bone be the centerpiece it deserves to be.
My Hill Country Kitchen Notes and Mistakes to Avoid
After years of cooking T-bones in my Hill Country kitchen, a few hard-learned lessons stand out. The biggest mistake I see is cooking a cold steak. Straight from the fridge, the outside burns before the inside warms up, leaving you with that thick gray band and a cool center. Temper your steaks. Pull them out 45 minutes to an hour ahead and let them lose the fridge chill. It is the easiest fix in the world and it makes a real difference in how evenly the steak cooks.
The second big one is a pan that is not hot enough. A timid pan steams the meat instead of searing it, and you never get that dark crust. Your cast iron should be genuinely smoking before the steak goes in, and you should hear an aggressive sizzle, not a gentle hiss. Right behind that is moving the steak too soon. Once it is down, leave it alone for a few minutes so the crust can form and release on its own. If it is sticking, it is not ready to flip yet.
A couple more. Under-seasoning is rampant, because a thick steak needs more salt than feels natural, so be generous and salt early. Forgetting the thermometer leads to guesswork and overcooked tenderloins, so use one and check both muscles. And skipping the rest dumps all your juices on the cutting board. None of this is hard, but a great T-bone lives in the details. Cooking is forgiving, and the more steaks you cook, the more these moves become second nature.
If you fall in love with cooking big cuts of beef like this, the same patience and thermometer habits carry right over to the holiday showstopper. When I want to feed a whole table, I lean on my Texas Roadhouse prime rib for that low-and-slow roast with a beautiful crust. The cut is bigger and the timing is longer, but the principles are identical: season well ahead, cook to temperature not to time, rest properly, and slice against the grain. Master a T-bone and you can cook almost any steak with confidence.
Texas T-Bone Steak Recipe
Ingredients
- For the steak:
- 2 T-bone steaks (1.25 to 1.5 inches thick, about 1 to 1.25 lb each)
- 2 teaspoons kosher salt (more as needed)
- 1 1/2 teaspoons coarse black pepper
- 1 teaspoon garlic powder
- 1 to 2 tablespoons neutral oil (canola, grapeseed, or avocado)
- For the garlic butter baste:
- 4 tablespoons unsalted butter
- 4 garlic cloves, smashed
- 4 to 6 sprigs fresh thyme (or rosemary)
- Flaky finishing salt, to serve (optional)
Instructions
- Temper and dry the steaks. Take the T-bones out of the fridge about 45 minutes to an hour before cooking and let them come up toward room temperature. A cold steak cooks unevenly, leaving you with a gray band around a cold center. Pat both sides and the edges completely dry with paper towels. Surface moisture is the enemy of a good crust, because the pan has to boil that water off before it can brown the meat, so dry steaks are non-negotiable.
- Season hard. Mix the kosher salt, coarse black pepper, and garlic powder. Season both steaks generously on every side, including the fatty edges, pressing the seasoning into the meat so it sticks. Steak this thick needs more salt than you think, since a lot of it stays on the surface. If you have time, season and let the steaks sit uncovered another 30 to 40 minutes, which dries the surface further and seasons deeper for an even better crust.
- Heat the cast iron screaming hot. Set a cast-iron skillet over high heat and let it preheat for 4 to 5 minutes until it is genuinely smoking hot. A properly hot pan is what gives you that dark steakhouse crust. Add a thin film of neutral oil and swirl it. It should shimmer and just start to smoke. If you prefer a reverse sear, instead warm the steaks in a 250F oven to about 110F internal first, then sear hot at the end. Either way the pan must be very hot for the crust.
- Sear the strip side. Lay the steaks into the pan away from you so the oil does not splash back. Press them down for good contact and let them sear undisturbed for 2 to 3 minutes until a deep brown crust forms. Do not move them or peek early, since lifting the steak breaks the crust before it sets. Position the larger strip side over the hottest part of the pan and angle the leaner tenderloin side toward a cooler edge, because the tenderloin cooks faster and you want to slow it down.
- Flip and sear the bone side. Flip each steak and sear the other side another 2 to 3 minutes for that same deep crust. Then, using tongs, stand the steaks up on their bone-and-fat edge for 30 to 60 seconds to render the fat strip and brown the edge. The bone insulates the meat right next to it, so giving that edge direct contact helps it cook more evenly. By now both flat sides should be crusty and dark brown, not gray, all the way across.
- Butter baste with garlic and thyme. Drop the heat to medium. Add the butter, smashed garlic cloves, and thyme sprigs to the pan. As the butter melts and foams, tilt the skillet so the butter pools at the lower edge, then spoon that foaming, garlicky butter over the steaks again and again for 1 to 2 minutes. This bastes the meat with flavor and helps cook the top gently. Keep angling the tenderloin side away from the hottest spot so it does not race ahead of the strip.
- Check temperature and pull. Slide an instant-read thermometer into the thickest part of the strip side, not touching the bone, since the bone reads differently. Pull the steaks at 125 to 128F for rare, 130 to 135F for medium-rare, or 140F for medium, remembering the temperature climbs about 5 degrees while resting. Check the tenderloin side separately, because it almost always runs hotter. If one side is ahead, pull the steak and let the rest finish it. This thermometer step is what guarantees the doneness you actually want.
- Rest, then slice off the bone. Move the steaks to a board and rest them uncovered for a full 10 minutes so the juices redistribute instead of running out. To serve, cut along both sides of the bone to free the strip and the tenderloin in two whole pieces. Then slice each piece across the grain into half-inch strips, which shortens the muscle fibers and makes every bite tender. Fan the slices back around the bone, spoon over the pan butter, and finish with flaky salt.
Frequently Asked Questions
What is the difference between a T-bone and a porterhouse?
They are the same cut from the short loin, separated only by the size of the tenderloin. A porterhouse is cut from farther back where the tenderloin is bigger, so by the official standard its tenderloin must be at least 1.25 inches wide at the widest point, while a T-bone has a smaller filet side. In other words, a porterhouse is essentially a large T-bone with a more generous tenderloin. You cook them exactly the same way.
What temperature is medium-rare for a T-bone?
Pull the steak at 130 to 135F measured in the thickest part of the strip side, not touching the bone. The temperature climbs about 5 degrees while it rests, so if you want a true 135F medium-rare on the plate, take it off the heat around 130F. For rare aim for 120 to 125F, and for medium go to about 140F. An instant-read thermometer is the only reliable way to nail it, since the two muscles feel different to the touch.
T-bone vs ribeye, which is better?
It depends on what you want. A T-bone gives you two textures in one steak, the firm beefy strip and the buttery tenderloin, divided by the bone. A ribeye is one heavily marbled muscle that is rich, fatty, and beefy throughout, and it cooks more evenly since there is no lean side to worry about. Neither is better, they are just different. If you want variety and a little drama, go T-bone. If you want pure marbled richness, go ribeye.
Can I cook a T-bone on the grill?
Absolutely, and the grill adds a smoky char that cast iron cannot. Get the grates screaming hot and sear over direct heat to build a crust on both sides. For thick steaks, slide them to a cooler zone to finish cooking through without burning the outside. You lose the in-pan butter baste, but you can top the rested steak with a pat of garlic compound butter instead. Just like indoors, check the temperature with a thermometer and rest before slicing.
How thick should a T-bone steak be?
I want mine 1.25 to 1.5 inches thick, and I would not go thinner for a good steak. A thick cut lets you build a deep, dark crust on the outside while keeping a juicy medium-rare center inside. Thin steaks cook through before any crust forms, so you end up with a pale or overcooked steak. If the case only has thin ones, ask the butcher to cut you a couple of thick steaks fresh. They are almost always happy to do it.
Do I need to reverse sear a T-bone?
Not for a standard 1.25 to 1.5 inch steak. A straight hot-pan sear in cast iron gives excellent results and is faster. Reverse searing, where you warm the steak in a low 250F oven first and sear it hot at the end, really pays off on extra-thick steaks pushing 1.75 inches or more, because it gives an even pink interior with almost no gray band. For everyday T-bones, the simple cast-iron sear in this recipe is all you need.
Why do I need to rest the steak?
Resting lets the juices redistribute back through the meat. During cooking, heat pushes the juices toward the cooler center, and if you cut in right away they all spill out onto the board and the steak goes dry. Let it rest about 10 minutes and those juices settle back through the steak, so it stays moist when you slice it. Rest it uncovered on a board to keep the crust crisp, and use that time to make your pan sauce.